The most important job of any plumbing system is to deliver clean water and to keep that water clean from sewage and other contaminants. This makes up the first and second of the basic plumbing principles in the Minnesota State Plumbing Code, which read as follows:
A. All premises intended for human habitation, occupancy, or use shall be provided with a potable water supply which meets the requirements of the commissioner of health. Such water supply shall not be connected with unsafe water sources nor shall it be subject to the hazards of backflow or back-siphonage.
B. Proper protection shall be provided to prevent contamination of food, water, sterile goods, and similar materials by backflow of sewage. When necessary, the fixtures, device, or appliance shall be connected indirectly with the building drainage system.
A large section of the plumbing code is dedicated to protecting our potable water supply, so it’s a good idea to check your own home for some of the most obvious violations and fix them. Truth-In-Housing Evaluations have a big focus on protecting the municipal water supply, and homeowners are typically required to repair conditions that could contaminate the potable water supply.
Check out the old video clip below for some good information about the importance of protecting the municipal water supply. The first minute and forty-five seconds waxes on and on about who made the video possible, then they get to the actual content.
As mentioned in the video, any potential cross-connections are potential sources of contamination.
Toilets
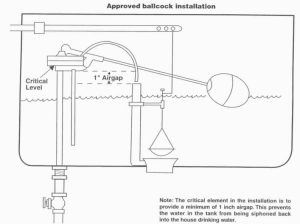
A cross-connection between the water in a toilet tank and the potable water supply can be made if the toilet fill valve or toilet ballcock is improperly installed. There are three most common types of toilet fill valves; the old-style ballcock, the new style fill valve, and the clamshell type. The ballcock relies on a floating ball to shut off the water supply when the water in the tank gets high enough. The approximate height at which the fill tube connects to the ballcock is considered the “Critical Level” line, and it needs to be at least 1″ above the top of the overflow tube. The diagram below illustrates this.
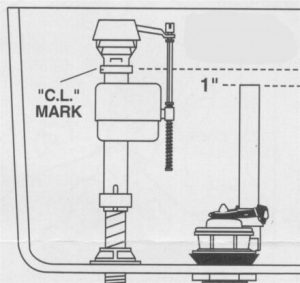
By far the most popular type of fill valve today is the type with a float attached to the stem of the fill valve, which is shown in the diagram below. Again, the critical level line needs to be 1″ above the top of the overflow tube.
A far less common type of fill valve is the clam-shell type, which sits at the bottom of the toilet tank. These valves create a potential cross-connection and just shouldn’t be used.

While the risk of contamination to the potable water supply is fairly low, I suspect most people would prefer to not drink the water in their toilet tanks if they didn’t have to. While on that topic, here’s a fun photo I took during a home inspection many years ago. I flushed the toilet as I was filling the bathtub, and the filthy water in the toilet tank was siphoned into the water going into the tub, instantly turning the tub water black.

Gross, huh? That’s why the guts of the toilet matter.
Outside Faucets, Utility Sink Faucets
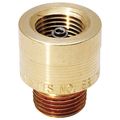
Any time a garden hose can be attached to a faucet, the faucet should be protected from a cross-connection. On older faucets without a built-in vacuum breaker, this could be achieved by installing an external vacuum breaker, as shown below.
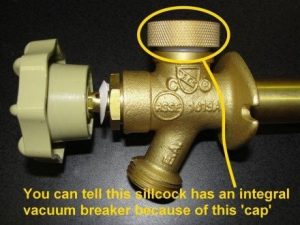
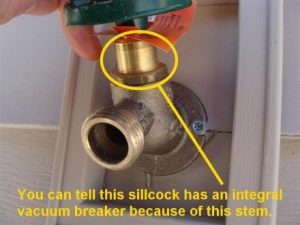
Every faucet I’ve seen on new construction homes for the past decade or so has come with built-in backflow prevention and can be identified by a slightly longer stem. The photos below show examples of faucets with integral backflow prevention. These faucets don’t need an external vacuum breaker.
Utility sink faucets with threads that will accept a garden hose should have an exterior vacuum breaker installed. Don’t install vacuum breakers at the hot and cold water valves for the washing machine though; washing machines already have an internal air gap.
Bath Tub Faucets
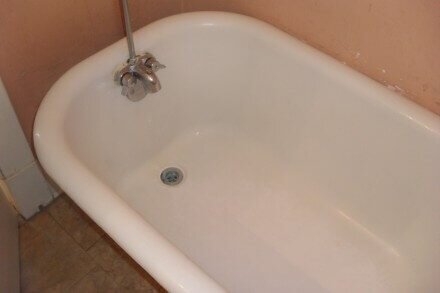
If you have an old bathtub with a faucet located inside the tub, such as the one pictured below, you have a potential cross-connection. Don’t mind the height of the overflow; the overflow is not the same as the spill line, as a clogged drain would also mean a clogged overflow.
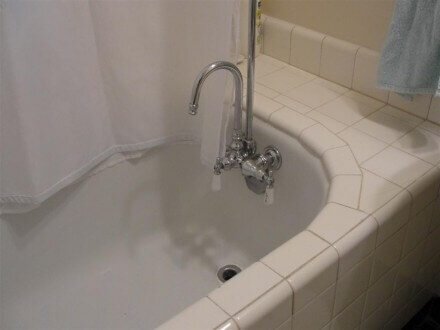
One way to correct this issue is to replace the faucet. A proper faucet for a clawfoot tub will have the opening of the faucet spout located well above the spill line of the fixture, as shown below. I found a decent selection of replacement faucets at http://www.vintagetub.com/asp/tub_faucets.asp.
If you like the faucet you have or you just don’t want to change out the faucet, another option is to have dual in-line check valves installed on the water supply pipes, as shown below.
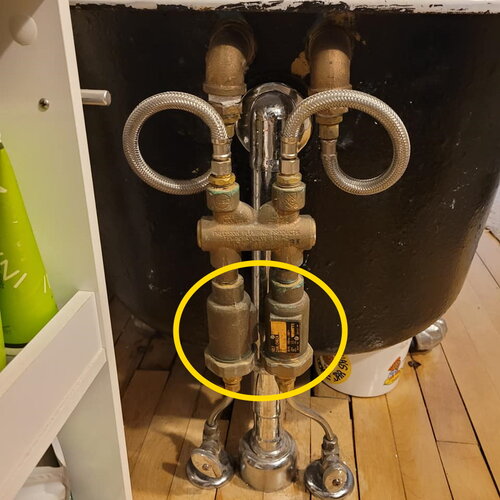
These valves will prevent potentially contaminated water from flowing back into the potable water supply. If you choose this method, make sure the check valves are accessible; when the next inspector comes through, they’ll probably be looking for them. If an inspector can’t find these valves, they’ll surely assume they don’t exist.
Bathroom Sink Faucets
Very old bathroom sink faucets with openings below the spill line of the fixture create a potential cross-connection. This usually happens with the type of faucets shown below, where there is a separate faucet for both the hot and cold water. My tape measure is sitting on top of the spill line of the fixture to show the relationship of the faucet openings to the spill line. The faucet openings should be at the same height as the top of my tape measure to create a 1″ air gap.
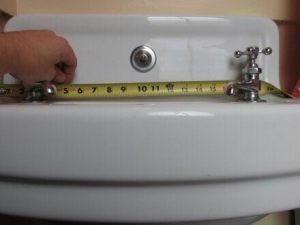
This is a bad setup to start with because there is no way of tempering the water coming out of the faucets unless you want to fill the sink… and who wants to do that?
The best fix is to replace the faucets with a single faucet, which may also require the replacement of the sink. Another option is to install check valves on the water supply pipes.
One non-recommended way to fix this cross-connection is to bend the faucets up a little bit to create an air gap. I say non-recommended because there is a risk of permanently damaging the fixtures, but I bring up this fix because I’ve seen it done many times.
Dishwashers
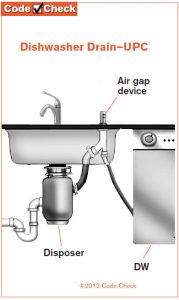
If the dishwasher drain hose is improperly installed, there’s a potential cross-connection at the dishwasher. The Minnesota State Plumbing Code (section 414.3) actually says that dishwasher drains are supposed to have an air gap, which is this ugly thing that sits on top of the counter, as shown in the diagram below (courtesy of CodeCheck).
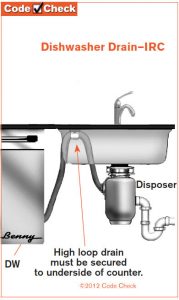
Up until January 23 of 2016, it was acceptable to have the dishwasher drain hose looped up underneath the sink, as long as “the drain line is fastened as high as possible under the countertop.” The diagram below shows a nice example of this:
While this no longer meets the requirements of the Minnesota State Plumbing Code, I say “meh”. This is close enough. Nobody likes those air gaps.
Water Softeners
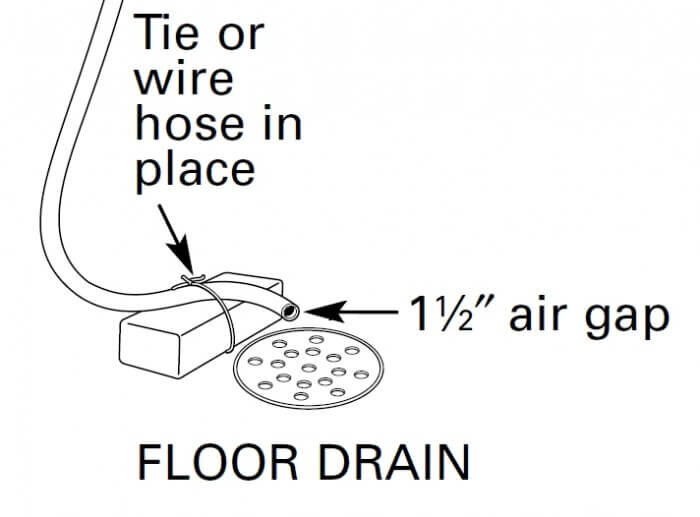
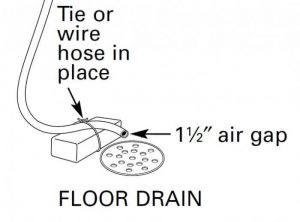
The discharge hose on a water softener needs to have an air gap at its termination; it should never connect directly to any fixtures or drains. The two most common places to terminate a water softener discharge hose are at a utility sink or a floor drain. There are about a bazillion ways to create an air gap, so here are a few nice examples. This first diagram shows the instructions that come with a water softener. Easy enough.
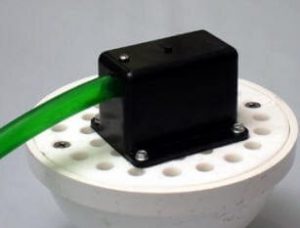
The only problem with the setup shown above is that it will make a big ol’ mess of the floor. This next one is a pre-manufactured solution called the Handy GaP, which will prevent water from splashing all over.
The only problem with the setup shown above is that it will make a big ol’ mess of the floor. This next one is a pre-manufactured solution called the Handy GaP, which will prevent water from splashing all over.
If the water softener discharges to a laundry sink, simply figure out a way to make the hose terminate 1-1/2″ above the spill line of the sink. The photo below shows one example of this.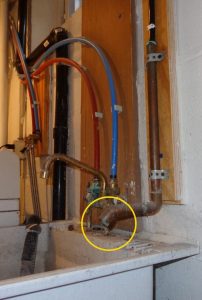
Conclusion
These are the most common cross-connections that home inspectors find. If you have any of these cross-connections in your own home, your “good citizen” duty is to fix them. Next week I’ll cover inspecting your furnace.
Click on any of the links below to see the past topics in this series:
- How to Inspect Your Own House, Part 1: Roof and Chimney
- How to Inspect Your Own House, Part 2: Exterior Water Management
- How to Inspect Your Own House, Part 3: Siding
- How to Inspect Your Own House, Part 4: The Rest of the Exterior
- How to Inspect Your Own House, Part 5: Electrical
- How to Inspect Your Own House, Part 6: Plumbing
Author: Reuben Saltzman, Structure Tech Home Inspections
Shortcuts in this post: sillcocks, bath-tubs, toilets, lavs, hand-showers, dishwashers, water-softeners, boilers
Photos from New Construction Home Inspections, Part IV | Structure Tech Home Inspections
November 11, 2014, 5:27 am
[…] Dishwasher drains are supposed to be looped to the underside of the countertop. This is done wrong on a lot of new homes. I mentioned this condition during my recent blog post on cross connections, but it’s worth bringing up again. […]
Top "Feel-Good" Home Inspection Pics from 2014 | Structure Tech Home Inspections
December 23, 2014, 5:01 am
[…] install if you have an old two-handle bathroom sink faucet with separate spouts for hot and cold. Click here for an example of what this […]