In last week’s blog post I gave advice about homeowner siding inspections, based on the most popular types of siding in the Twin Cities. For this week’s post, I’ll cover the things a homeowner can do to inspect the rest of the exterior of their home. This will cover such items as foundation walls, vegetation, windows and doors, and vent terminals.
Vent Terminals
Before inspecting the exterior of your home, do what we do at the beginning of our home inspections and turn on any fans or devices that blow air out of the house. This includes the clothes dryer, bathroom exhaust fans, the kitchen fan if it exhausts to the exterior, and the air exchanger, also known as a Heat Recovery Ventilator (HRV). Now go outside and locate the terminal for each one of these devices, and make sure there’s air coming out of every device.
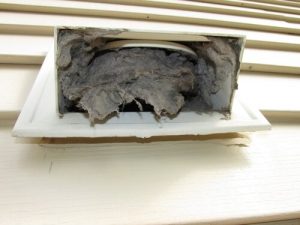
It’s common for these devices to terminate at the roof; if that’s the case, you’ll probably need to get on the roof to make sure everything is working properly. When fans exhaust into the attic, they can cause major problems in cold climates like Minnesota. Be careful when looking underneath vents; wasps love to make nests at vent terminals, both at the roof and on the ground. If you can’t account for every device that’s supposed to be removing air from your house, or there’s no air coming out of a terminal but there should be air coming out, it’s something that should be looked into further. As I’ve mentioned many times in previous blog posts, the clothes dryer terminal needs to be cleaned regularly. Ideally, clothes dryers should not be vented through the roof.
For more information about inspecting your bath fan exhaust, click here: https://structuretech.com/bath-fan-terminal-inspections/
If there’s a screen present at the clothes dryer exhaust, remove it. Screens get clogged and should not be installed at dryer terminals. Check any intake grills to make sure they’re clean; the most common one is the combustion air intake. Take a second to read through my blog post on combustion air duct problems and solutions to help know what you’re supposed to be looking for. If your home has an air exchanger, the combustion air intake and the air exchanger/HRV intake will probably be located right next to each other, and they look identical.
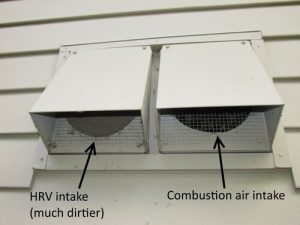
The way to tell them apart is that the HRV intake usually gets dirty much faster than the combustion air intake… not that it really matters. You just need to make sure they’re both clean and clean them both on a regular basis. If your home has an HRV but you can’t find the intake, you have a problem. Maybe it was covered up when the house was re-sided, or maybe it’s located underneath the deck where nobody can ever get at it to clean it. Those are both problems that should be addressed.
Windows and Doors
If you have old wood windows, check to make sure the paint and glazing putty are in good condition. A good layer of paint will help to protect the windows, and the glazing putty is what holds the glass in place.
To check for rot, you don’t need to go around poking at every single window and door. As I mentioned in my blog post about exterior water management and last week’s post about exterior water management, just figure out which areas will rot first. Windows covered by big overhangs will probably never rot, while windows that see a lot of water will rot relatively quickly. If you’ve already had a chance to walk around your house during a heavy rainstorm, this should be very easy to do. Just think about which windows get the most water exposure. For windows located on large gable end walls, check the lowest windows. They’ll see the most water.
If you have wood windows, take an awl or a screwdriver and give the bottom corners of the windows a poke to check for rotted wood. If you have wood windows with aluminum cladding, give your window sashes a push and a squeeze. I made a video many years ago showing how to do this. See below.
The same advice applies to wood doors and aluminum-clad sliding glass doors.
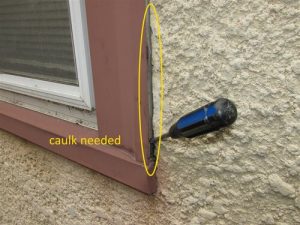
If you have an older home with windows and doors that have been wrapped with aluminum, make sure all of the joints and seams in the aluminum are properly caulked to prevent water intrusion, and re-caulk any areas with dried out or split caulking.
Caulk
Every homeowner should own a caulking gun and caulk. Go around the outside of your house and look for dried out or split caulking that needs to be serviced. Just be aware that not everything on the exterior should be caulked; some areas are supposed to be left open to allow water to drain out. I have a couple of examples of places that shouldn’t be caulked in some older blog posts: Don’t Caulk Here. This might be one of those topics where there are just too many variables to cover every potential situation.
Vegetation
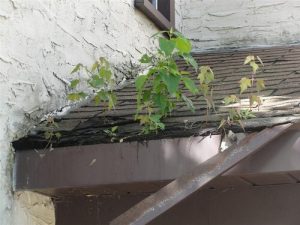
This one is easy. Keep vegetation away from your house. For trees and tree branches, keep stuff trimmed at least six feet away. No trees too close to the house. One foot of clearance for bushes and smaller stuff. No ivy, period.
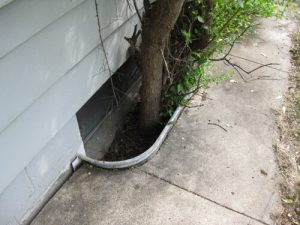
Oh, and if you have trees growing right out of the shingles on your roof… don’t forget to water them.
Foundation Walls
Small cracks in foundation walls are normal, and usually not worth getting excited about. For a concrete block wall, that means cracks that are less than 1/4″ wide. For poured concrete, cracks that are less than 1/8″ wide. That’s certainly not a hard and fast rule, but it’s a good general guideline to go by.
The trick is to figure out whether cracks in the walls are caused by active movement or not. To help determine this, cracks can be patched with cement or mortar. If the cracks open up again, there’s probably active movement, which is a structural concern that should be further inspected by a foundation specialist.
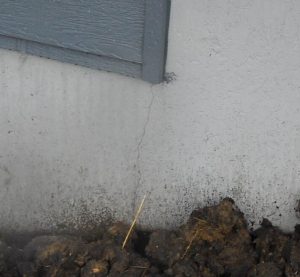
The other concern with cracks in foundation walls is that water can leak right through the cracks; the photo below shows a small crack in the foundation wall of a new-construction home. This tiny crack resulted in water leaking right through the wall and into the basement.
Soffits and Fascia
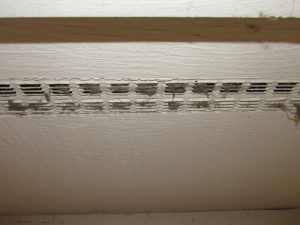
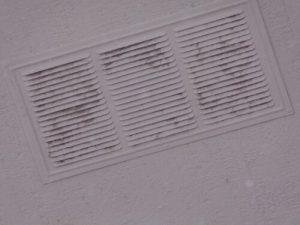
Inspect the soffits and fascia for rotted wood and any holes that could admit pests. Also, check your soffit vents to make sure they’re clean; a clogged soffit vent will hamper air flow to the attic space. As mentioned in my previous blog post about roof vents, proper ventilation in the attic may help to extend the life of the roof, reduce the potential for ice dams, and reduce the potential for frost in the attic. The photos below show a couple of different types of soffit vent grills that need cleaning.
Driveways and Walkways
Raised edges in sidewalks and driveways create trip hazards. While this is one of those ‘no-duh’ defects, it’s also something to take seriously and have fixed. Falls are the leading cause of unintentional home injury deaths.
Decks
Decks are deserving of their very own post. Check out my blog post on how to inspect your own deck.
That concludes this four-part series on inspecting the exterior of your own home. Included below are links to the previous posts in this series:
- How to Inspect Your Own House, Part 1: Roof and Chimney
- How to Inspect Your Own House, Part 2: Exterior Water Management
- How to Inspect Your Own House, Part 3: Siding
Author: Reuben Saltzman, Structure Tech Home Inspections
![]()
![]()
![]()
![]()
![]()
![]()