Thanks to Moore’s Law, infrared cameras keep getting better and less expensive. The folks at Thermal Master are getting into the handheld infrared camera game, and they sent me a Thor001 camera to check out, which is available for $599. They also offer a Thor002, which has some minor differences and retails for $399. The only major difference between the two cameras is that the 001 comes with an external macro lens. For this reason, I will simply refer to it as the Thor camera. Also, I’m going to compare this to the FLIR E6-XT camera, which has been my benchmark for numerous infrared camera reviews and retails for approximately $2,000.
I couldn’t find much information on the Thermal Master website, so I contacted the manufacturer, and they directed me to this page, which was helpful: https://thermalmaster.com/pages/user-guide.
Size, shape, and feel
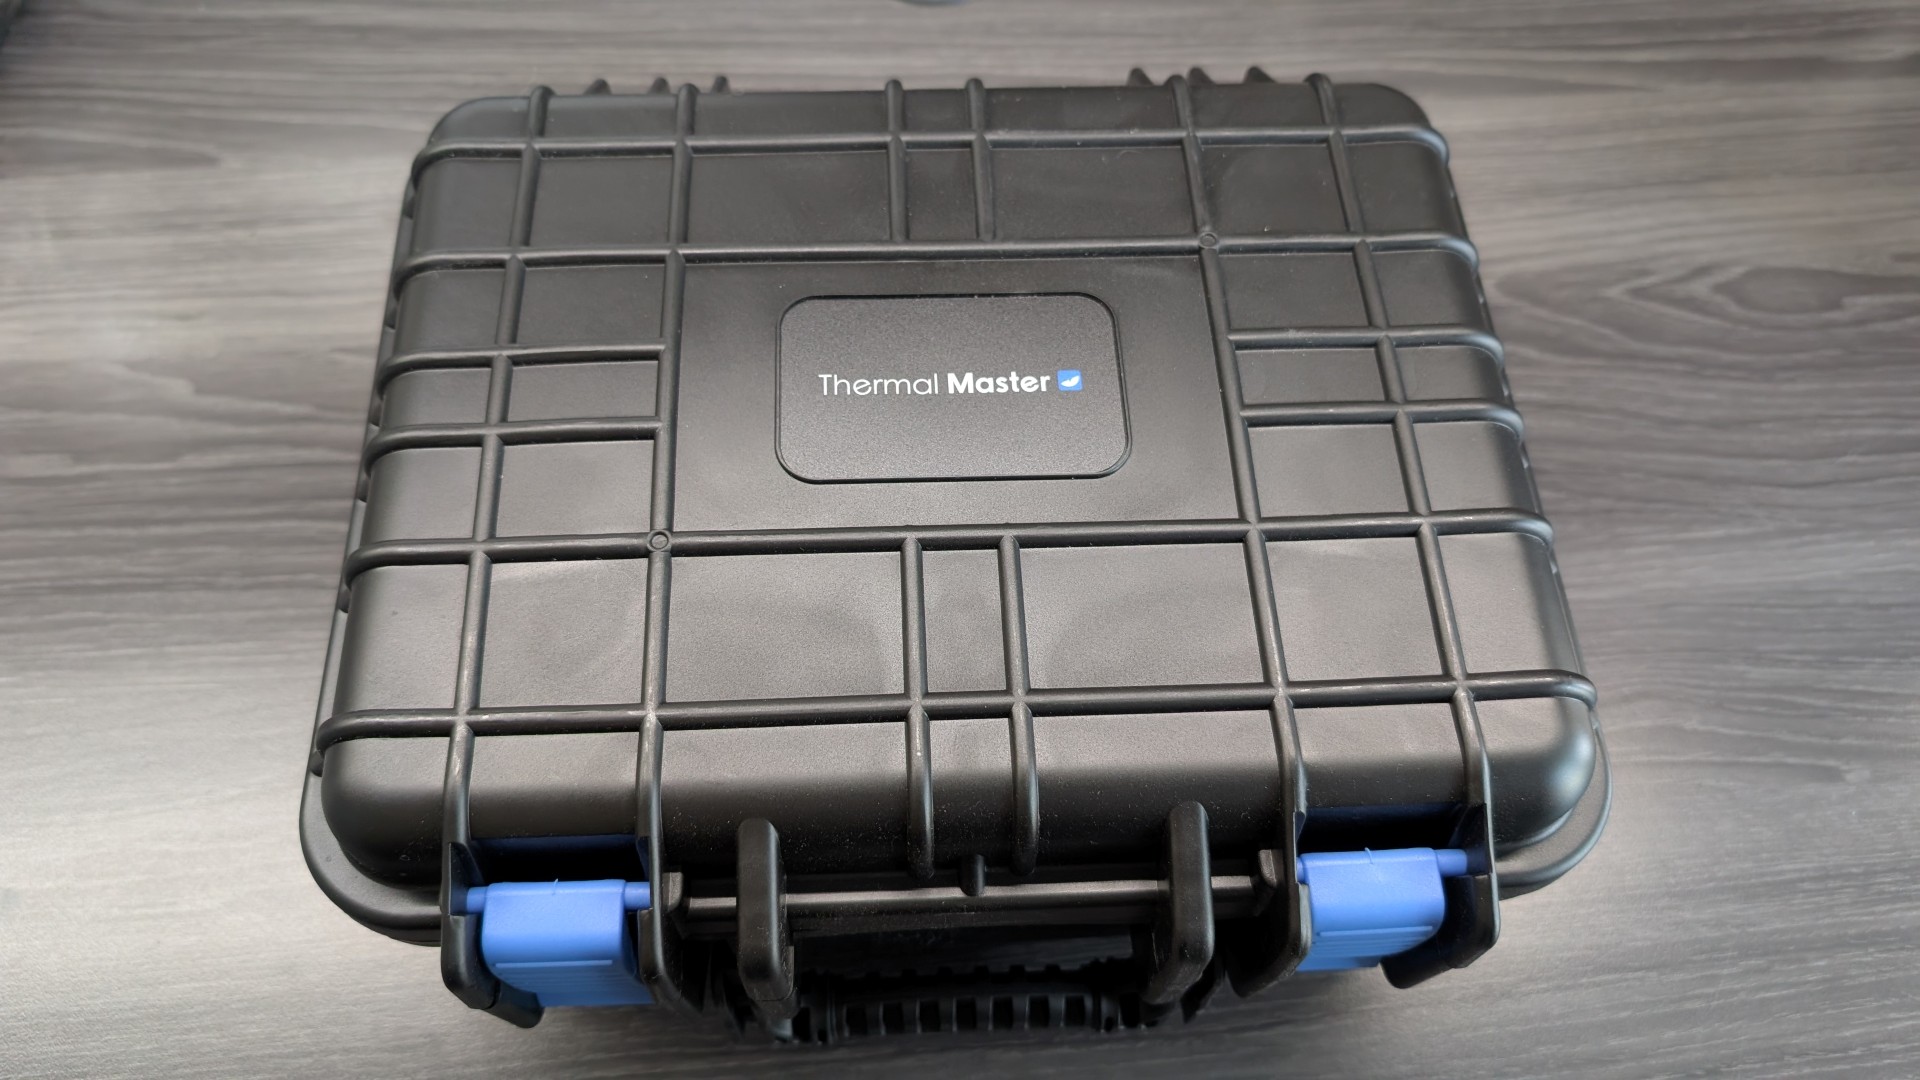
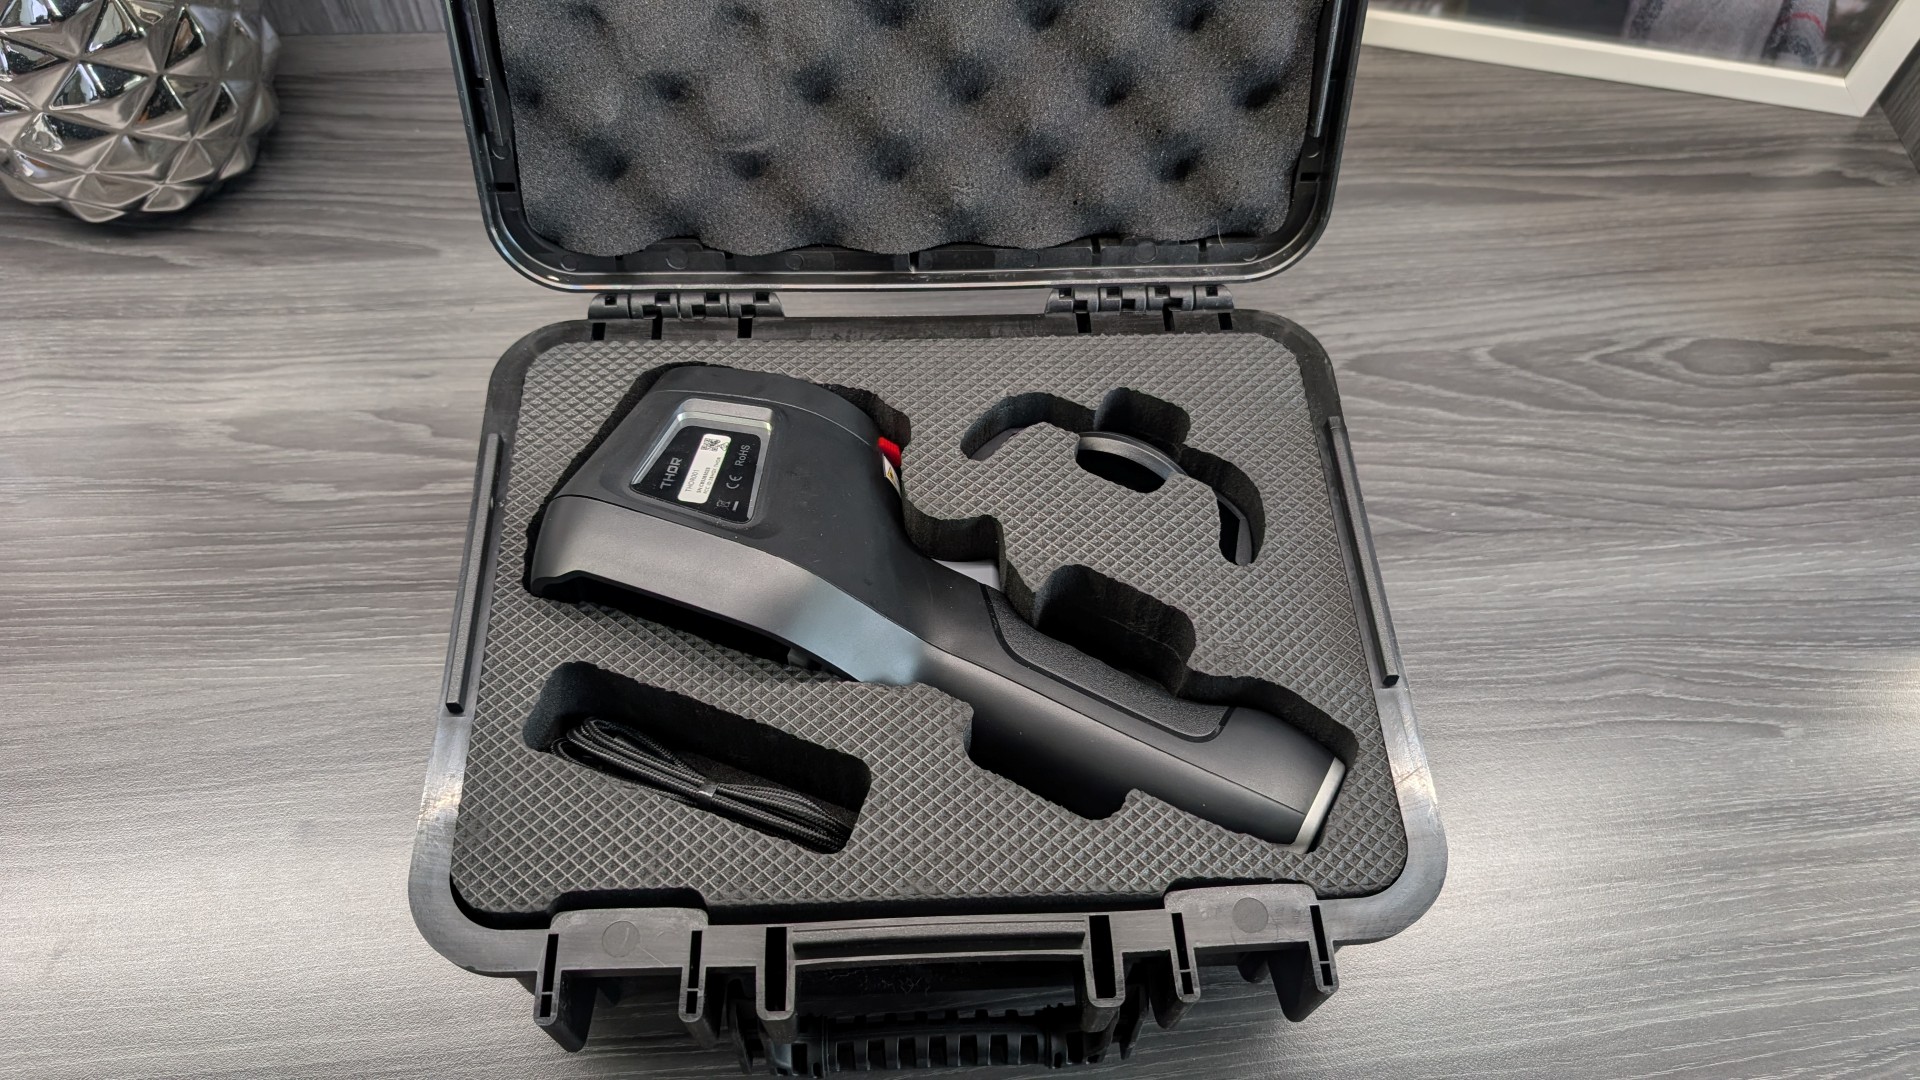
The camera comes in a heavy-duty padded case that you could probably drop from a roof and still not damage your camera. Very nice. It also comes with a heavy-duty USB-C charging cable.
It comes with a 32 GB micro-sd card for storage. This is far more than I could ever imagine needing. My only concern with an sd card is that someday I would accidentally leave my card at home, and I wouldn’t be able to record images out in the field. Because of this, I would likely only transfer images using a USB cable.
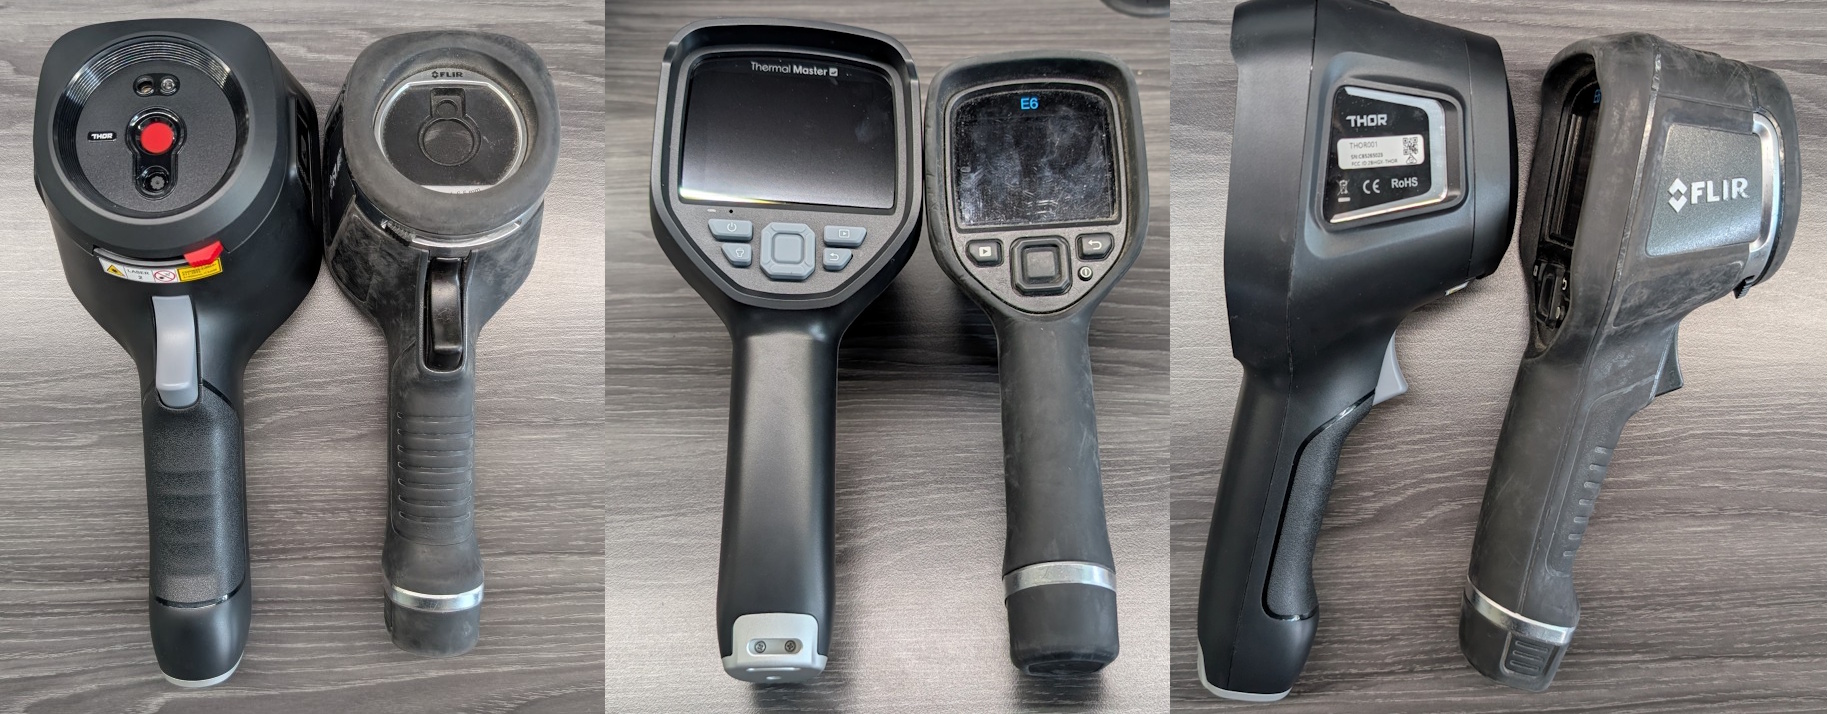
The camera is huge, like Mjölnir (Thor’s hammer). Maybe that’s where the name came from. By comparison, it makes the FLIR E6-XT camera feel like a little pipsqueak. Maybe some people like the feel of a huge camera, but I don’t. I prefer small cameras; the smaller the better.
The screen is huge, offering a resolution of 640×480. It really looks great, and it has a fancy splash screen when you boot it up.
It takes pictures in landscape format, which I prefer for home inspection work.
The Thor does not have a removable battery, but it’s designed to last for 8 hours on a single charge, which is plenty of juice for a full day of home inspections.
Field of view
The Thor has a 40° x 30° field of view. By comparison, the E6-XT has a 45° x 34° field of view. I prefer the wider view, but the difference is hardly noticeable, even when holding the two cameras side by side.
Built-in camera
It comes with a built-in optical camera. When you record a thermal image with this camera, it also captures an optical image. This is very helpful for home inspection work. The optical images have a low resolution: 640×480, which is the same as the E6-XT.
The camera offers image blending, which combines an infrared image with an optical image. Check out the example below.
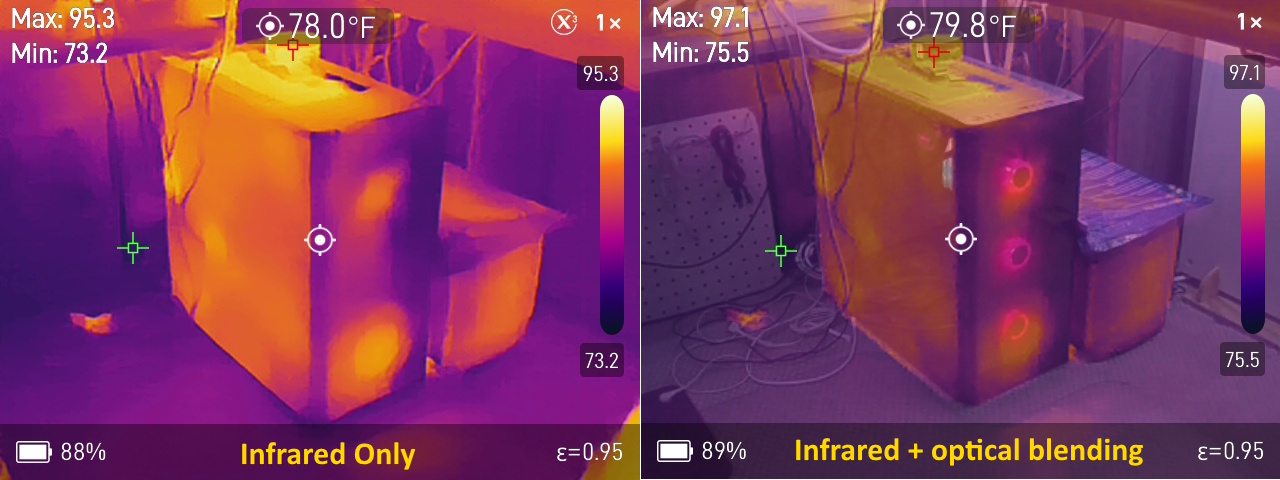
For comparison, the FLIR E6-XT offers a version of image blending, called MSX technology. Check it out below:
And here are a few more side-by-side comparisons of Thor’s image blending vs E6-XT’s MSX images:
What do you think? I prefer the MSX technology offered by the E6-XT. I think the image blending offered by the Thor camera tampers down the infrared image too much, making it so you lose a lot of detail.
Resolution
The Thor camera has a native resolution of 256×192, but can upscale images to 512×384 with super-IR “X³” technology. I asked the manufacturer how this works, and this was their answer: “Super IR resolution is an algorithm-based technology rather than a hardware upgrade. The algorithm works by splitting a single physical pixel into two for display, thus gathering more data for image enhancement. Technically, this boosts the resolution from the physical 256×192 to algorithmic 512×384. However, since the difference between physical and algorithmic, it’s not directly comparable to native 384 or 640 resolution products. Our goal is to provide customers with better image quality at a much more affordable price than those expensive higher-resolution models.”
Ok, very nice. By comparison, the E6-XT has a resolution of 240×180. The thermal sensitivity is <35mK, which is far superior to the E6-XT at <60mK. The lower the number, the better. This indicates how well the camera can capture subtle temperature differences, which is the primary reason for using an infrared camera.
Image Casting
You can cast images to a PC or a mobile device. The website says to use an app called “Thermal Smart”, but I couldn’t find this app on the Google Play store. I tried the Thermal Master app, and all it did was crash on me when I tried scanning the QR code on the camera. I contacted the manufacturer, and they directed me to install the app on my phone through a direct download of an sdk file. My phone gave me a warning about installing software in this manner, but I proceeded anyway.
After installing the app and connecting my phone to the camera’s Wi-Fi, the image-casting feature worked flawlessly. Whatever you see on the camera, you also see on your mobile device. Very nice.
Miscellaneous
This camera takes a long time to boot; approximately 25 seconds. By comparison, the E6-XT takes about 7 seconds. I’m used to switching my IR camera on and off throughout an inspection, and the wait time to boot would really bug me. But on the other hand, if the battery life really does give you eight hours in a day, it would probably be fine to simply leave the camera on. If you give the power button a short press it goes into sleep mode for 20 minutes, and wakes up instantly with another short press. That would be very handy for home inspections.
It features an LED light on the front and includes a laser pointer, which I find particularly helpful. I like knowing exactly where my camera is pointed.
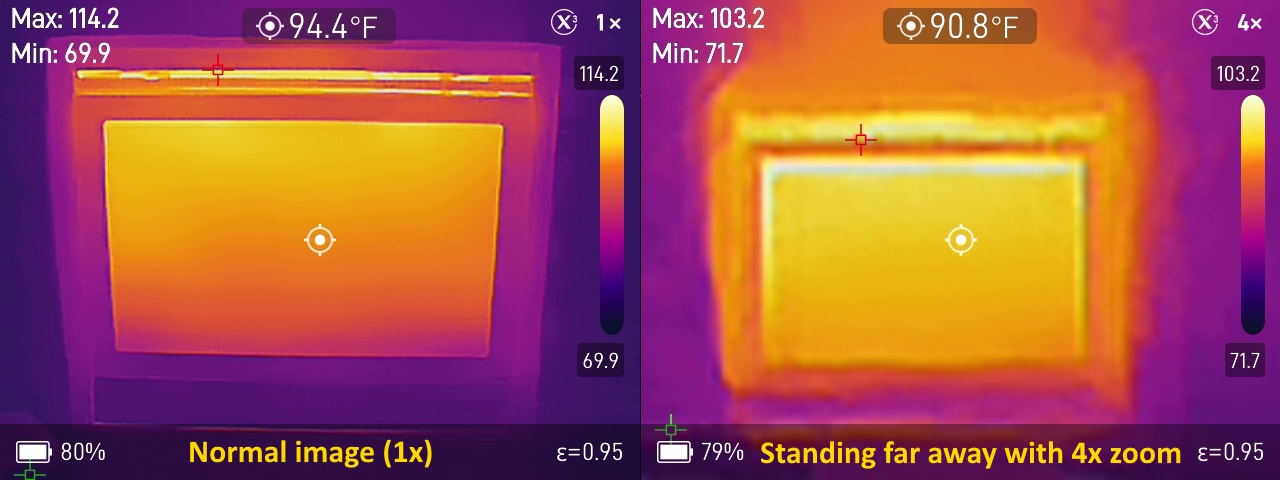
This camera offers 2x and 4x zoom, but it’s digital zoom, which I consider to be worthless. Check out the comparisons below.
The Thor also offers video recording, while the E6-XT does not.
The menu options go on and on; way more options than I’m going to list. For example, you can individually remove each of the information points displayed in the image above, such as max and min temps, spot temp, zoom level, battery level, etc. And after you reboot the camera, it remembers your settings, which is great.
The screen refresh rate is 25Hz, which is far superior to the E6-XT at only 9Hz. If you check out my video above, you can see a nice comparison of the two. It makes the E6-XT look laggy.
While it comes with a removable macro lens, I would never need this for home inspection work. This might be helpful for someone working on a circuit board?
Image Comparisons
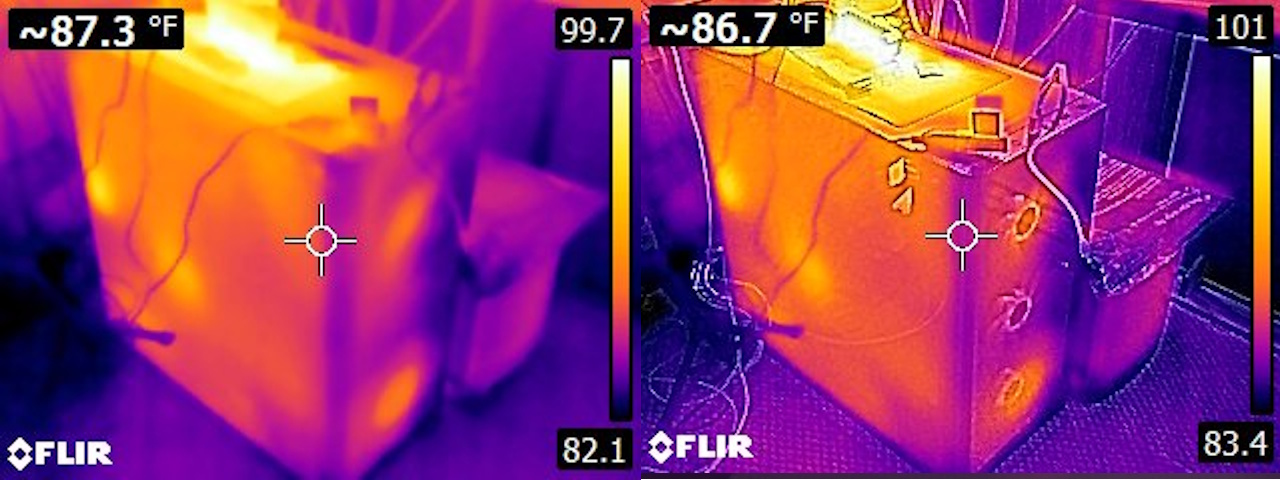
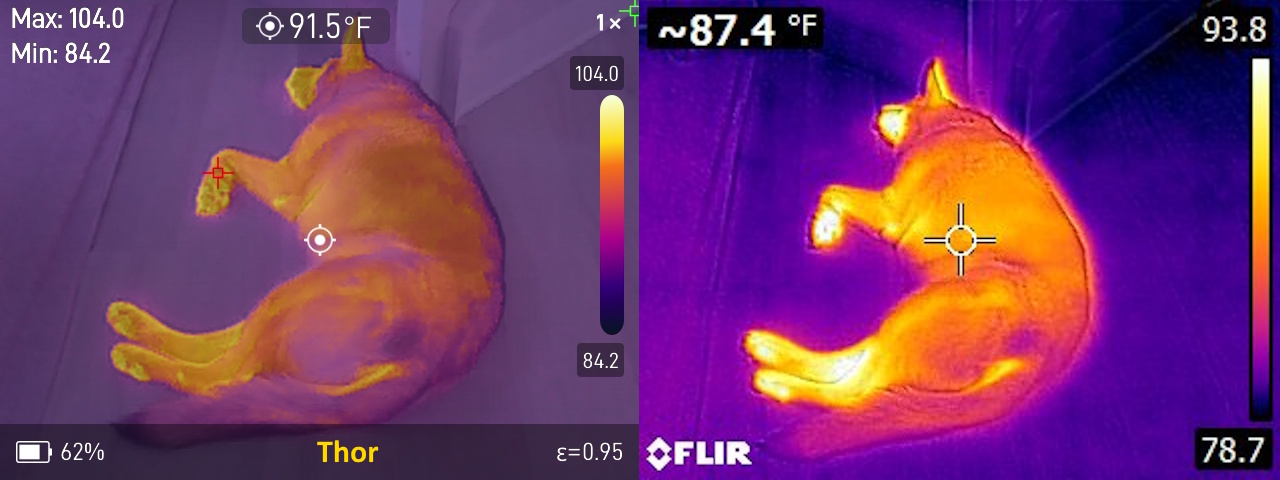
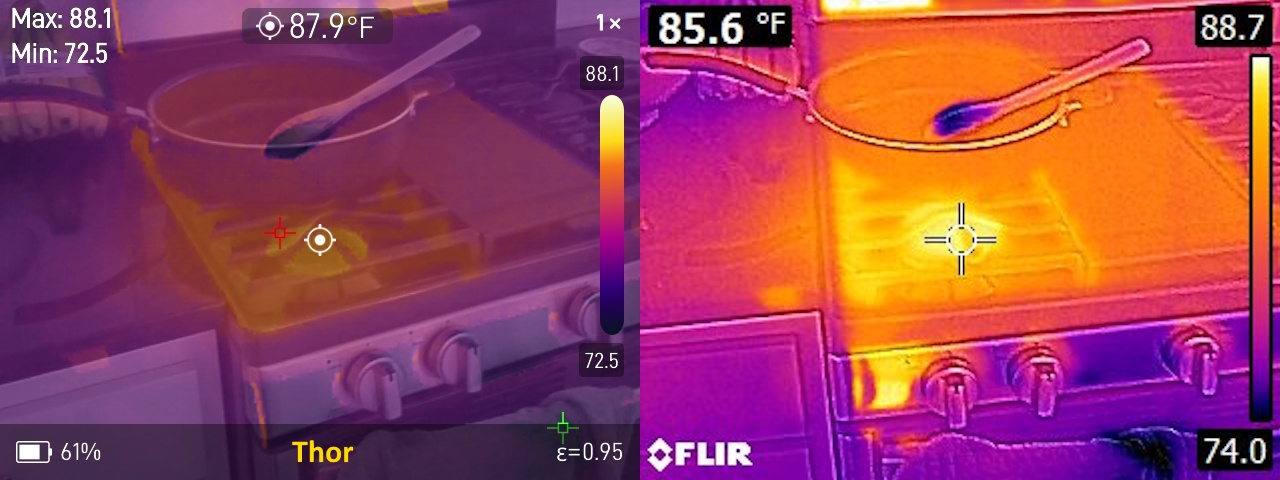
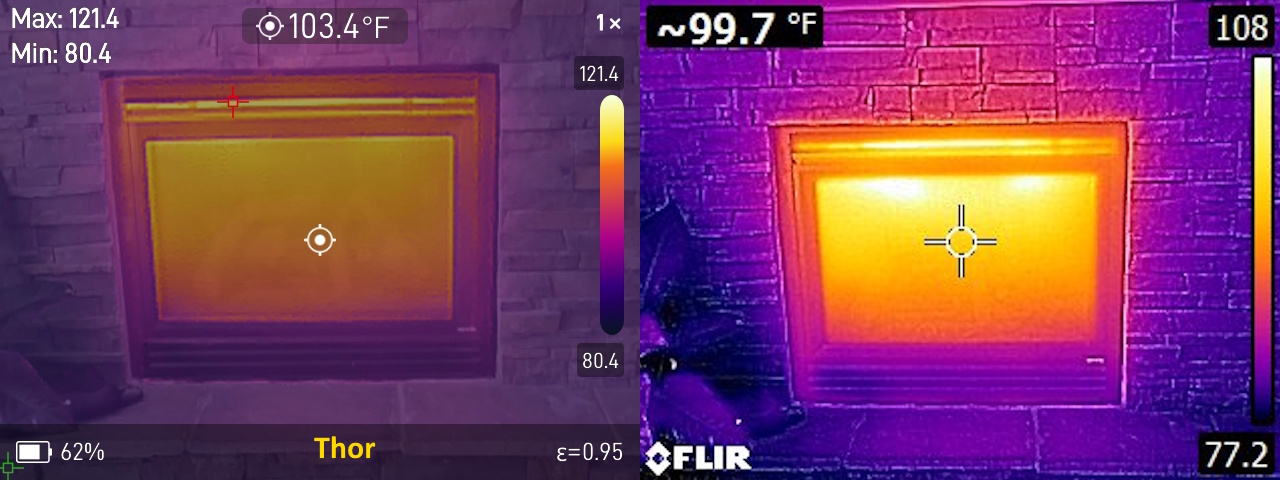
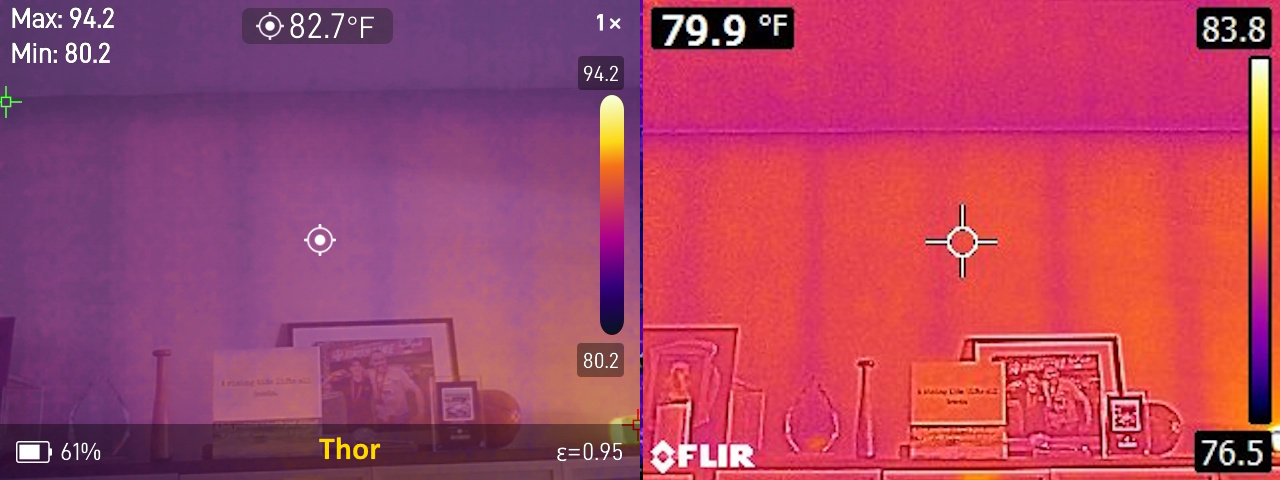
This is the most important part of an infrared camera; what do the images look like? For this, I’m comparing the Thor images head to head with the E6-XT, using infrared-only to make an apples-to-apples comparison.
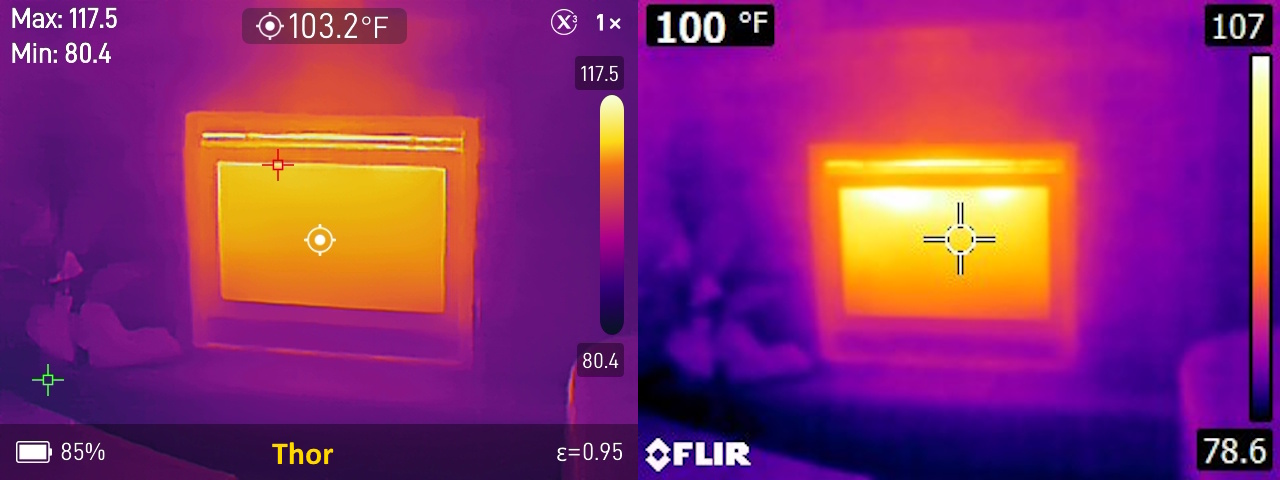
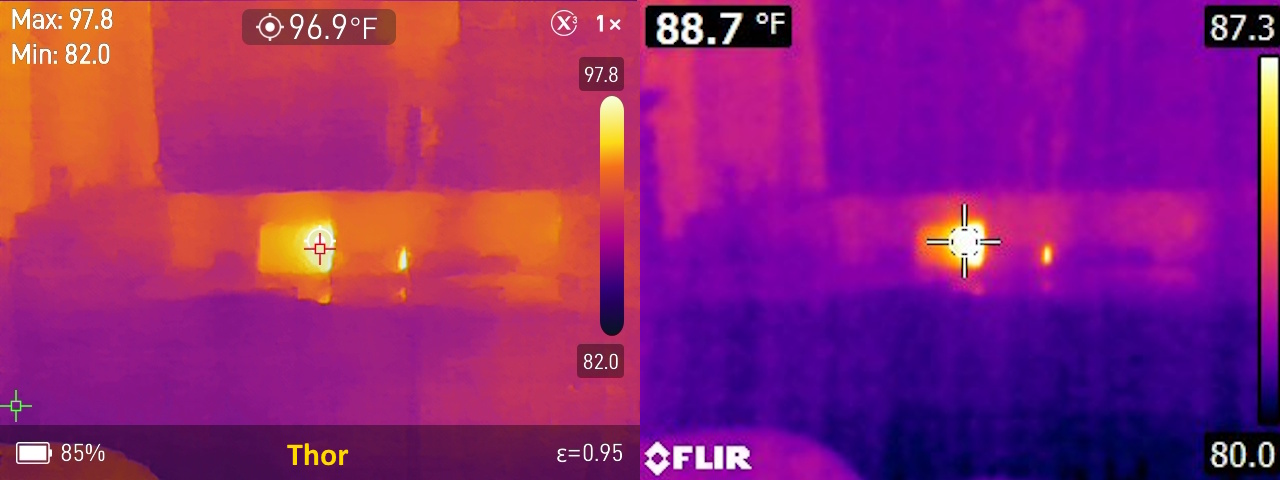
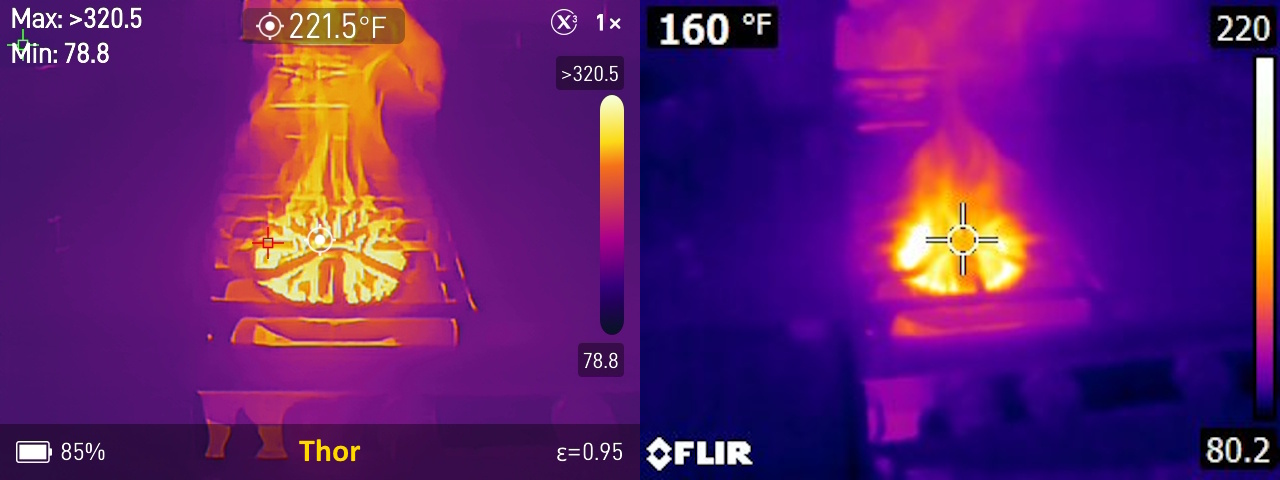
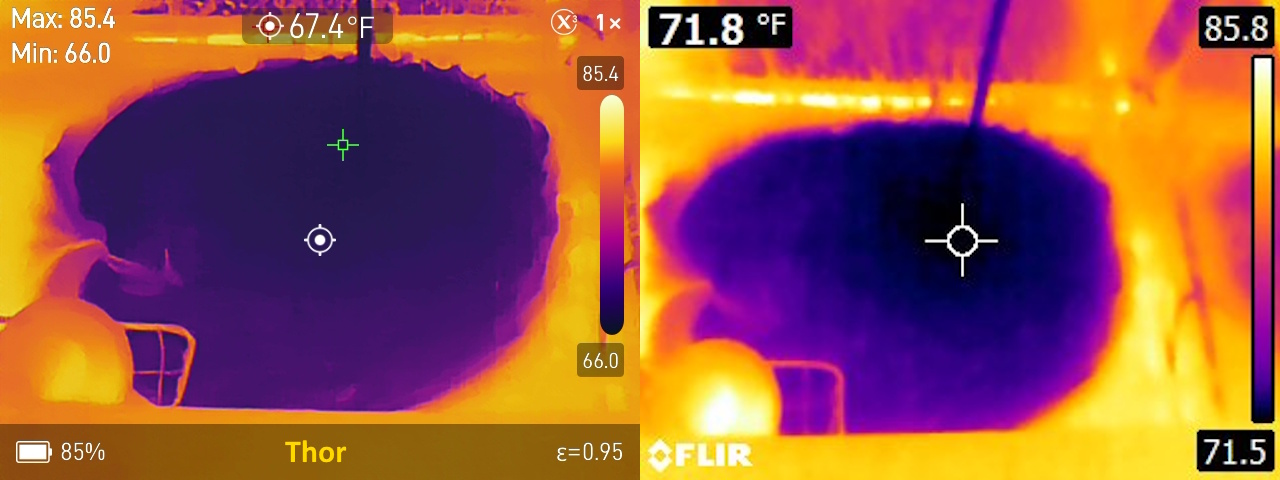
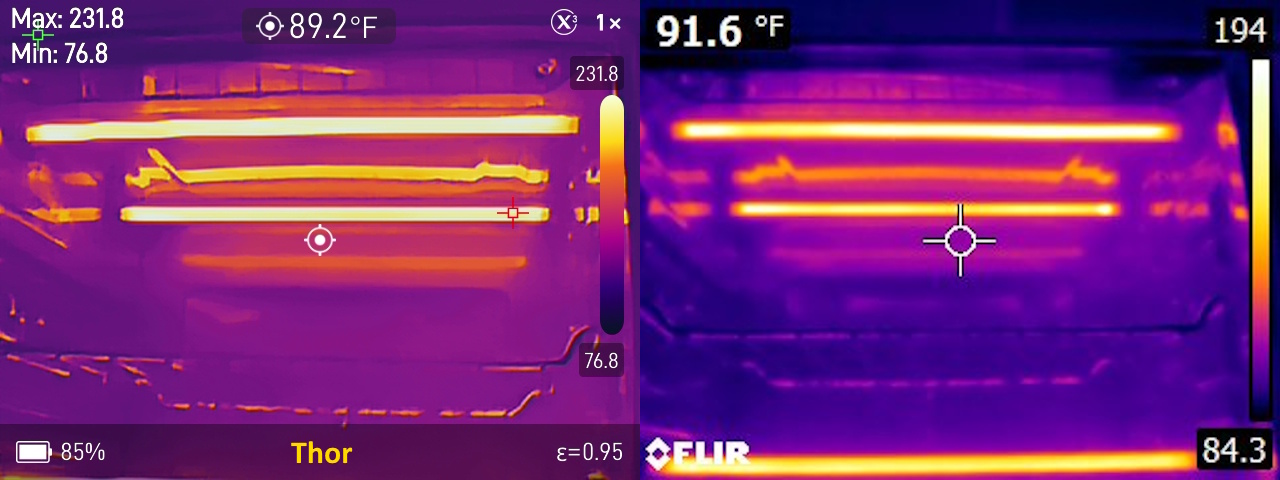
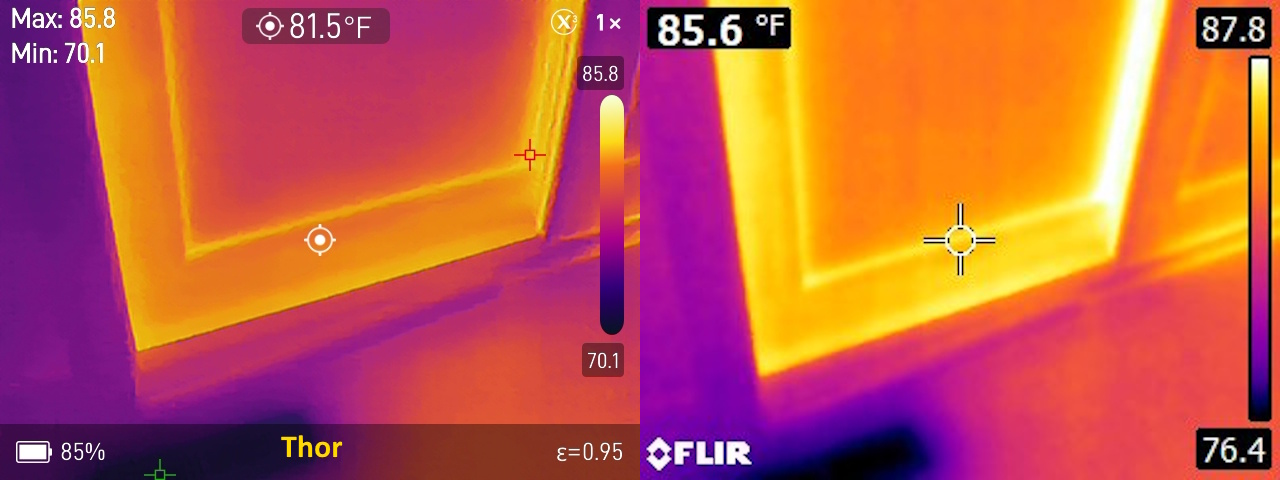
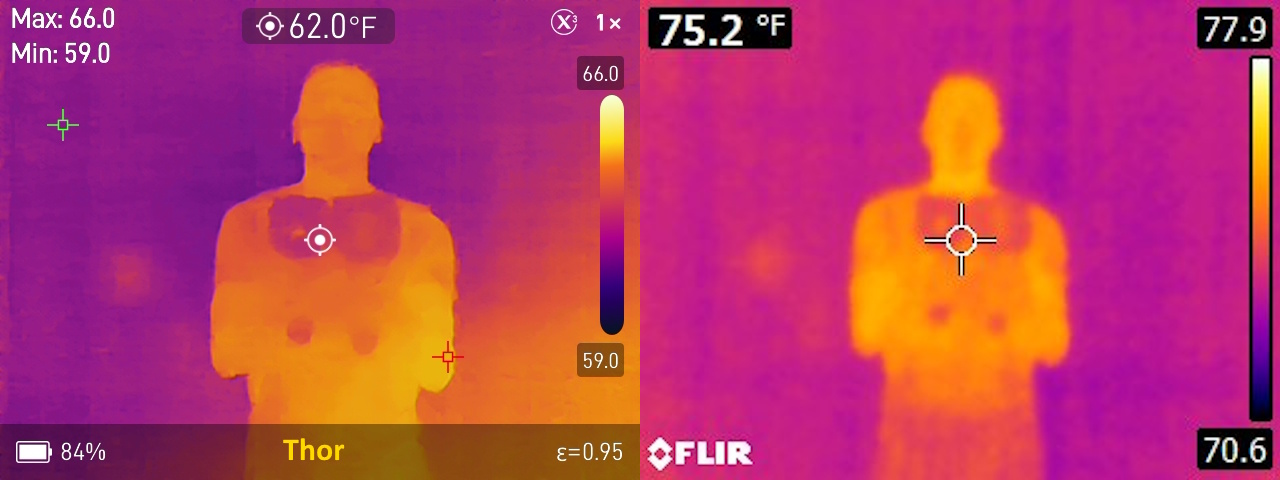
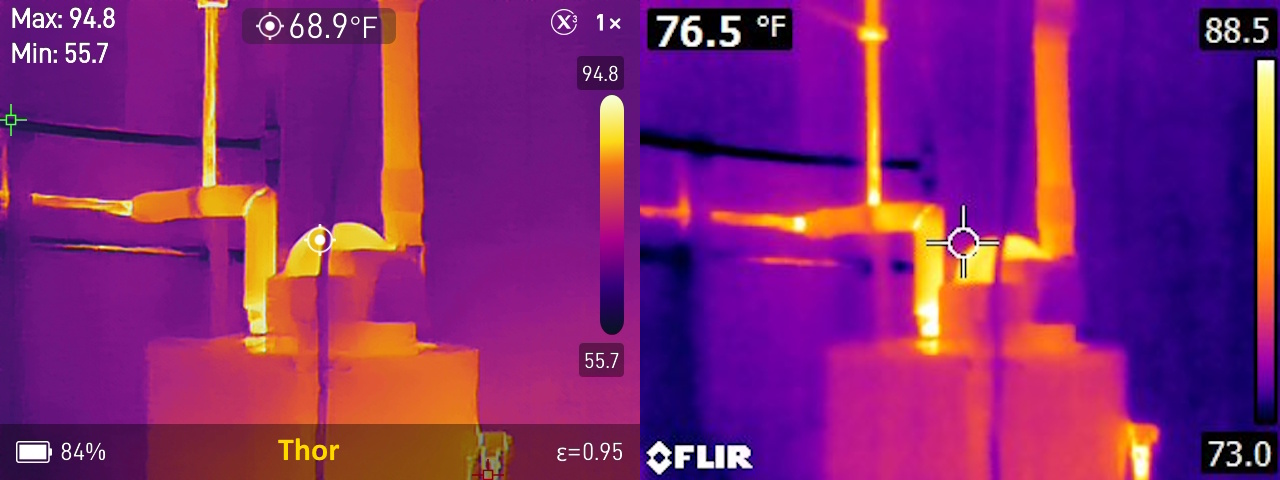
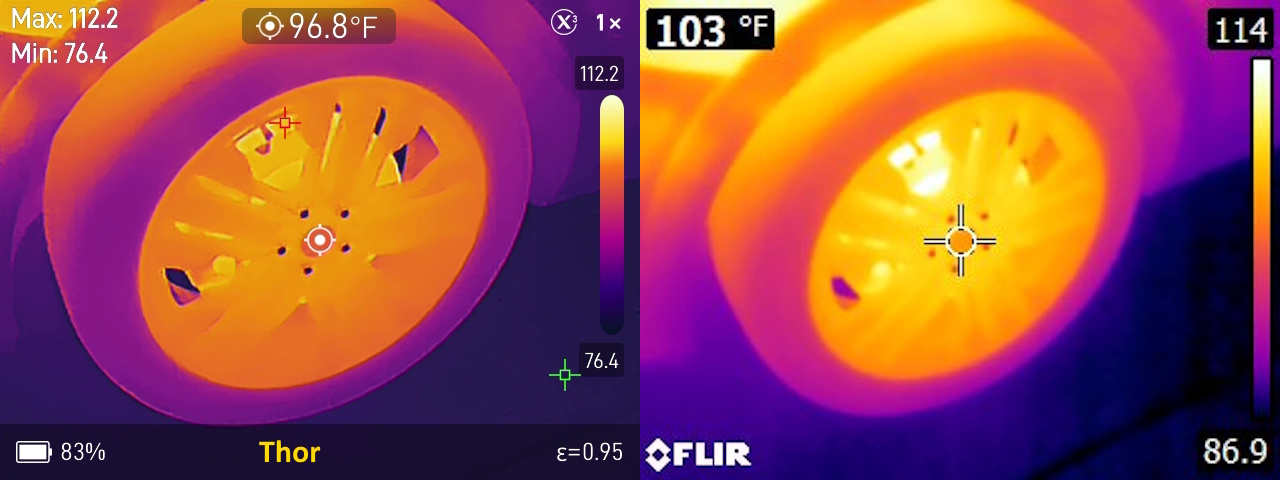
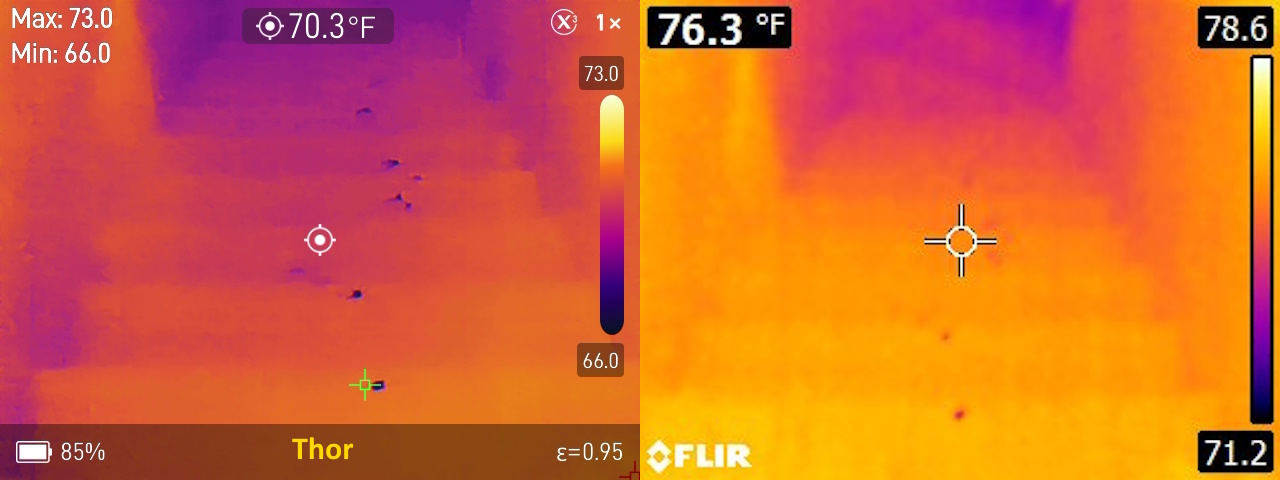
The Thor camera is a clear winner when it comes to image clarity; these images look crisp and clean, while the E6-XT images look a bit fuzzy. Most notably, check out the last images in my sequence; that’s slobber from my dog on the carpeted stairs after he drank a bunch of water. You can see it on the E6-XT, but it really pops with the Thor camera. That’s what higher resolution and improved thermal sensitivity gives you.
Conclusion
The MSX images produced by the FLIR E6-XT are better than the blended images produced by the Thor 001, and the camera is smaller. Besides these two things, the Thor camera is superior in every way. Far more menu options, video recording ability, external storage, far better IR image quality… the list goes on. And because the differences between the Thor001 and 002 are minor, you get the most value from the 002 camera, which again, retails for $399 on Amazon. They’re also offering a 5% off coupon right now (TMTHOR002), bringing the price down to $379.
In short, you’re getting a superior camera for a fraction of the cost of a FLIR E6-XT. You just need to get over the bulky size.
orin
August 5, 2025, 9:08 pm
Thanks so much for your video. It convinced me to grab the Thor001, and honestly, I can’t believe how much it helped.
I’m in Sarasota, Florida, stuck with a 20-year-old low-slope roof that’s been leaking like crazy. No way I could afford a full replacement unless I hit the lottery. I’ve already dumped 3 gallons of Henry’s wet patch on this thing, sealed up every crack I could find, even patched areas that just looked suspicious. Still leaking.
I was losing it. After your review, I figured I’d give the Thor001 a shot — just needed to know where the water was really getting in, not where it was showing up inside the house. The resolution on this thing is great, and being able to go back over the footage and double-check before tearing into the roof made all the difference.
I finally patched the right spots. First time in months, no leaks. Didn’t have to call a roofer, didn’t blow thousands of dollars. The Thor001 basically paid for itself on day one. Seriously appreciate the recommendation.
elsnn
August 5, 2025, 10:16 pm
Wow, thanks for demonstration. Very nice thermal camera.
orin
August 6, 2025, 8:53 pm
U should try out thor001 – 512×384 resolution 25hz refresh with macro lens for under $700. Flir go away flir. Flir 320×240, 9hz is around $2500.
I’m an hvac guy, I really like the resolution & fast response. I use it with note 20 U
camello
August 8, 2025, 6:27 am
Excellent review. If I were looking for a handheld unit, this would probably be at the top of my list. The 512×384 resolution and 25Hz refresh rate look great, and the fact that it comes with a detachable macro lens is a nice touch for close-up work. Thermal Master really seems to have done a good job here. Thanks for the great info!
dd ddd
August 17, 2025, 9:44 pm
I had considered other models before, but in the end I went with the P3. After actually using it, I feel the money was well spent — it has all the features I need, and the overall experience turned out even better than I expected.