With the recent snow storm we received in Minnesota and the crazy snow storm that dumped several feet of snow on the east coast, there will be plenty of people dealing with leaking roofs from ice dams. I have already blogged about how to prevent ice dams from happening, but I get far more inquiries about how to remove ice dams. There are plenty of ‘hack’ methods of removing ice dams, so I decided to discuss them. The methods I’m going to discuss involve an axe, ice pick, pantyhose, salt, heat cables, a pressure washer, and even a blowtorch… just for fun.
Let me repeat – these are all hack methods. I don’t advise any of these methods, but when people have water leaking in to their home, these DIY methods are what people turn to. Hopefully I can talk people out of doing most of these. The most effective and safe way to remove an ice dam is to hire a professional ice dam removal company that will use steam.
Axe
The most obvious way to get rid of ice dams is to take a blunt instrument and hack away at the ice dams. I tried an axe.

Pros: Fast results. I hacked through several feet of six-inch thick ice dams in a matter of minutes.
Cons: Unsafe, cumbersome, and you’ll wreck your roof. I had to set up a ladder on the icy ground and swing an axe while standing on a ladder. The ice also really flew in my face – I should have been wearing goggles. I was only able to remove the ice down to the gutter, and only able to get close to the surface of the roof without risking damage to the shingles. I’ve inspected dozens of roofs where someone got crazy with an axe at the eaves. It’s a great way to ruin your roof.
Verdict: This is a high risk, yet fast and effective way of getting rid of a lot of ice, but leaves the job incomplete. You’ll probably damage your roof doing this, and you might hurt yourself too.
Ice Pick
This sounds like a natural choice, doesn’t it? I actually used my awl, but close enough. I gave it my all. <insert crickets chirping>

Pros: Very fast results, very little effort. It’s as though this tool was made for picking at ice. Oh, wait… Still, I was genuinely surprised at how fast and accurate this method was.
Cons: Unsafe. Again, I was jabbing at ice dams while standing on a ladder, which was sitting on the icy ground. I also had to be very careful to not damage the roof.
Verdict: This worked quite well… but again, you’ll probably poke a bunch of holes in your roof doing this.
Roof Tablets
Yes, this is a product designed specifically for preventing damage from ice dams. Contrary to the name on the container, the product doesn’t actually melt your roof (whew). The instructions say to toss the tablets on to your roof and they’ll melt through the ice dams, allowing for “water to drain safely”.


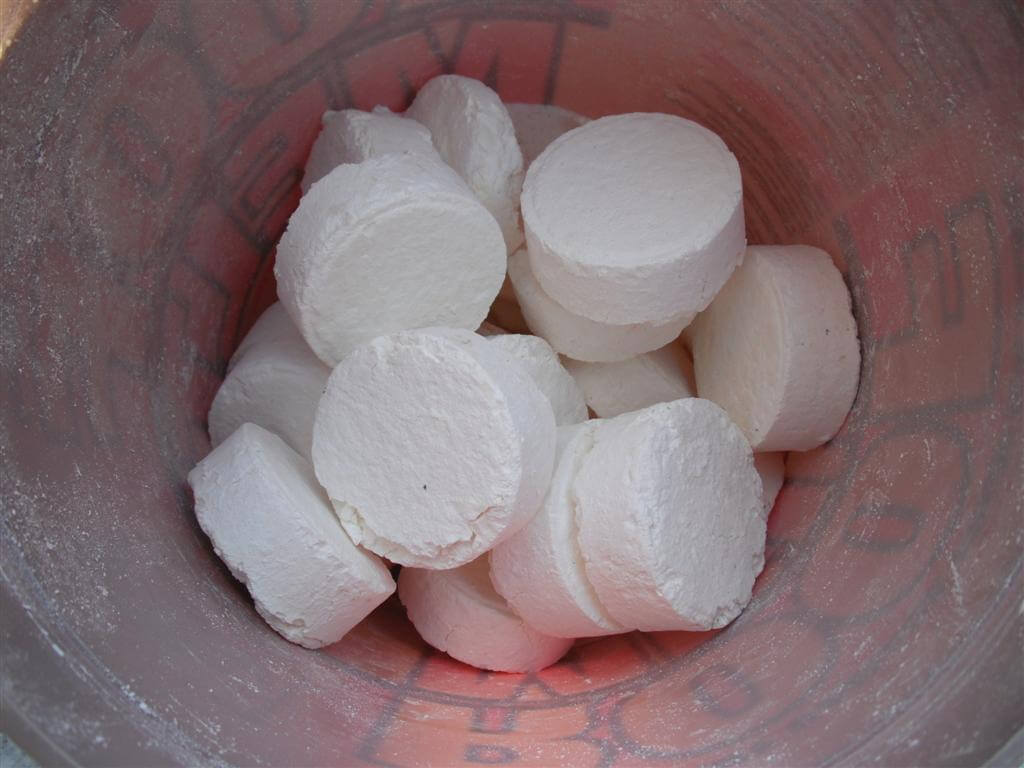
I tried tossing the tablets on the roof like the instructions said to do, but it didn’t work out very well. I consider my tablet tossing skills to be well above average, but I still couldn’t get the tablets to end up in a good location – they all just slid together in one place. If I didn’t get a ladder out to take pictures, I never would have known that the tablets didn’t end up in a good spot.

Just to give the roof melt tablets the best possible chance for success, I hand-placed them on the ice dam and I used about four times as much as the directions called for. The instructions said to put them higher up on the roof, but I wanted to make some holes in this ice dam.

By day two, I had some pretty dramatic results – the tablets had melted all the way through the ice dam. By the way, for anyone in a southern climate that might be reading this blog, that white stuff on the ice is snow, from a very light snowfall the night before.

By the third day, not much change. There were definite holes in the ice dam, and some channels had formed for water to drain through, but the majority of the ice was still there.


Pros: If you had perfect aim and tablets didn’t move after you tossed them on to the roof, this would be very safe. Some channels were created for water to drain through, which might be enough to prevent leakage at your roof.
Cons: The tablets don’t stay where they land, which negates the whole safety thing. I still had to set up a ladder on the icy ground and move the tablets around myself. This method was also pretty ineffective – it created a bunch of holes in the ice dam, but so what? Most of the ice dam was still there in the end.
Verdict: This might be a nice way to get down to the roof surface, and it might prevent leakage from ice dams if enough channels are created for water to drain through, but you’re still left with a huge ice dam.
Salt Filled Pantyhose
Take off your pantyhose, fill ’em up with calcium chloride or something similar, and toss ’em on your roof perpendicular to the ice dams. The idea is that the salt will leak through the pantyhose and create channels for the water to drain through, preventing water from leaking in to your house.
I filled one pantyhose leg with “Ice Melt”, which contained a blend of calcium chloride and rock salt. I filled another with an ice melting salt that didn’t have the contents labeled – I suspect it was just rock salt. I also poured the Ice Melt in a perpendicular line along the ice dam, using far less salt than I used in either of the pantyhose. I did this just to compare the results.
10:00 AM (Start Time)


2:00 PM


4:00 PM


The pantyhose were a bit of a bust for me. With salt alone being so effective, why bother with the pantyhose? I’ve heard several opinions on this:
- The pantyhose will contain the salt and prevent runoff. The idea is apparently to leave the pantyhose there all winter.
- The pantyhose can be ‘flung’ on to the roof with a rope – no need for a ladder. After the work is done, you pull the pantyhose back down.
- The pantyhose will gradually release the salt.
- The pantyhose method works much faster if you start by pouring water on the pantyhose. I didn’t try this myself.
- When salt alone is used, it will wash out within a week and the ice channel will freeze over again.
Pros: If you fling the stockings on to your roof from the ground, it’s pretty safe.
Cons: This takes a long time. After a week of near-zero temps, the pantyhose looked just the same. They hadn’t even made a dent. I don’t think I would have the patience to do this if I had water leaking into my house. Also, this could lead to damaged gutters.
Verdict: Better than nothing.
Heat Cables
For the record, heat cables aren’t supposed to be placed directly on ice dams, but some people might try it anyway. My friend did this at a house he owned in Saint Louis Park, so I took pictures. These photos all show the heat cables after about one day.


Pros: Gets the job done eventually, I suppose.
Cons: Heat cables aren’t made for this, and I’m sure the manufacturer would tell you that this poses some type of safety hazard. Stringing up the cable was also very unsafe.
Verdict: Don’t do this. Seriously.
Blowtorch
I received a request to use a blowtorch on an ice dam, so I tried it. This video was taken about four years ago. Sorry for the poor audio.
Pros: You can tell your wife you tried everything, even a blowtorch.
Cons: Cold fingers, waste of propane, waste of time, dangerous, etc.
Verdict: I think you get the picture.
High-Temperature Pressure Washer
A pressure washer will certainly remove ice dams, but it will create a ridiculous ice mess below, and will surely damage the shingles. This was one method that I didn’t even test. The photo below shows what can happen to a roof after a pressure washer or high-temp pressure washer is used on a roof.

There is a big difference between a steamer and high-temperature pressure washer. In the video below, Steve Kuhl discusses the difference with me.
Conclusion
Ice dams are no fun. As I mentioned at the beginning of this blog, hiring a pro to steam the ice dams off is the only thing I recommend.
Oh, and one more piece of advice: if you know someone who has water leaking into their house from ice dams, don’t tell them to “stop focusing on how to get rid of the ice dam, and spend your time fixing what caused it.” It’s like telling someone with a gash in their finger to be more careful around knives. “Great, thanks, now please pass the bandages.”
Reuben Saltzman, Structure Tech Home Inspections


![]()
BadgerBoilerMN
February 12, 2013, 8:05 am
We would recommend insulation. My hot roof does not produce ice dams.
mike in MN
February 13, 2013, 7:43 am
good writer, entertaining….i laughed my head off at the ‘insert crickets chirping’ comment and repeated to my wife. good info, i concur with the success probability of all the methods shown. being a MN guy i have tried all of these and am here becasue always looking for a better one. best method seems to be get the snow off right away after a fall. if you wait at all the dam starts. once it reaches a real problem stage you are stuck with going at it combat style (ax, hammer, etc) and risking shingle destruction. best melt through ive found is like shown here….just s thick layer of salt layed across the dam
Brian Casey
March 7, 2013, 6:04 pm
Great blog! Some of the best images I’ve ever seen–high pressure washer, pantyhose, tablets…all great stuff. An effective alternative might be our Radiant Edge. It prevents ice dams and icicles from the start by focusing heat right on the eave edge. More info at http://www.summiticemelt.com. Cheers!
Ren
March 9, 2013, 11:37 am
Thanks for the ideas that inspired me! I just tied a hairdryer on a 1×3″, 7′ long wood, turned on the switch, lean it against the eave aiming at a certain part of the ice dam, plugged it in, took some pictures and came in for lunch. It is shooting hot air at the dam. Water is dripping. I will let you know how it turns out sometime later.
Daryl
April 2, 2013, 1:27 pm
I love this guy…….he tried everything I tried, but I didn’t take photos, but thought I should have. My last desparate attempt was the roof tablets, which I placed yesterday (April 1, 2013) along the edge of the garage roof. While I left them to do their thing, whatever that might be, I went after the last remaining ice with a hammer, with firm but restrained downswings on the hammer. Somtimes finesse and patience just doesn’t cut it. PS Will take a pic of the roof tablets this evening.
Norma
April 3, 2013, 3:24 pm
So, what happens if you just leave the ice dams alone and let them melt when the weather gets warmer?
I hope that’s not a silly question.
Reuben Saltzman
April 3, 2013, 7:32 pm
Norma – probably nothing will happen if you just let the ice dams melt. The concern with ice dams is that they can cause leakage in to the home. If it hasn’t happened yet, it probably won’t happen at all.
Norma
April 3, 2013, 7:33 pm
Thank you! This post was very informative.
HotRoof Ice Solutions
April 24, 2013, 9:49 am
The most efficient way to prevent ice dams is to use a heated metal panel system along the eaves and in valleys. The system uses only a quarter of the heat cable used in zig-zag systems, saving up to 75% in energy. The system is 100% effective at preventing ice dams, and icicles. We are experts in the field of ice dams, with hundreds of installations in the Colorado Rockies. Affordable, easy to retrofit on any roof, 10 year warranty. See our web site: HotRoofIceSolutions.com and please call us if you want a permanent solution.
Reuben Saltzman
April 24, 2013, 1:02 pm
@HotRoof Ice Solutions – electric resistance heating panels are not “efficient”. In fact, they’re the opposite of efficient. Effective, sure. Insulation and air sealing is efficient.
How to melt snow | My Blog
June 27, 2013, 11:43 pm
[…] HOW TO REMOVE ICE DAMS […]
Dave Mckenna
September 9, 2013, 6:37 pm
Wow, great pictures. All useless remedies for Ice Dams. Pellets, socks and the guy who ran the heat tape vertical on the edge … seriously!
High pressure steam is a mess, Forcing water in cavities of your home, which will lead to mold.
If you have made an attempt to super insulate, and you know you will have the possibility of a re-occuring problem, its not to late to get a local roofer to place a heated roof edge or valley to prevent Ice Dams from forming this next season.
Dave Mckenna- Senior Engineer / heatedroofsystems.com
Joe Henslee
September 30, 2013, 9:44 pm
An ounce of prevention is woth a pound of cute. Summit Ice Melt Sytstems use a self-regulating heat cable combined with a heavy duty aluminum extrusion which maximizes the amount of heat energy created by your energy dollar and puts the highest percentage of the energy to work on the melting surfaces. Don’t be fooled by thin, ineffective sheet metal products which fail to proform. Check out our website and discover why we use 33% less electricity than our competition.
Joe Henslee
October 1, 2013, 2:39 pm
An ounce of prevention is worth a pound of cute. Summit Ice Melt Systems use a self-regulating heat cable combined with a heavy duty aluminum extrusion which maximizes the amount of heat energy created by your energy dollar and puts the highest percentage of the energy to work on the melting surfaces. Don’t be fooled by thin, ineffective sheet metal products which fail to perform. Check out our website and discover why we use 33% less electricity than our competition.
Reuben Saltzman
October 1, 2013, 2:41 pm
Cute.
Robby joe
December 15, 2013, 9:39 pm
Bottom line We all live in wrong kind of houses!!!!
A-Frames and tepee roofs ARE the only structures
that withstand 300 mph winds and shed all debris
and no snow no ice!!!!
Robby joe
December 15, 2013, 9:44 pm
What about a floor Steamer?????
Martha
December 18, 2013, 7:00 am
I always send my husband out with my hair dryer. LOL! That’ll teach him for not fixing the insulation problems and caulking up the cracks in our attic before the snow set in.