This is a guest blog post by Steve Kuhl of Radiant Solutions Company. Part 3 of 3.
Welcome to the final entry in my three-part series on ice dam prevention and heat cables. In part one, Should you install heat cables to prevent ice dams?, I discussed the most common solutions employed to prevent ice dams. In part two, Not all heat cable is created equal, I geeked out on the topic of heat cable types in depth. Today I will describe how to best employ heat cables on your home to prevent damage from ice dams.
Where To Install Heat Cables
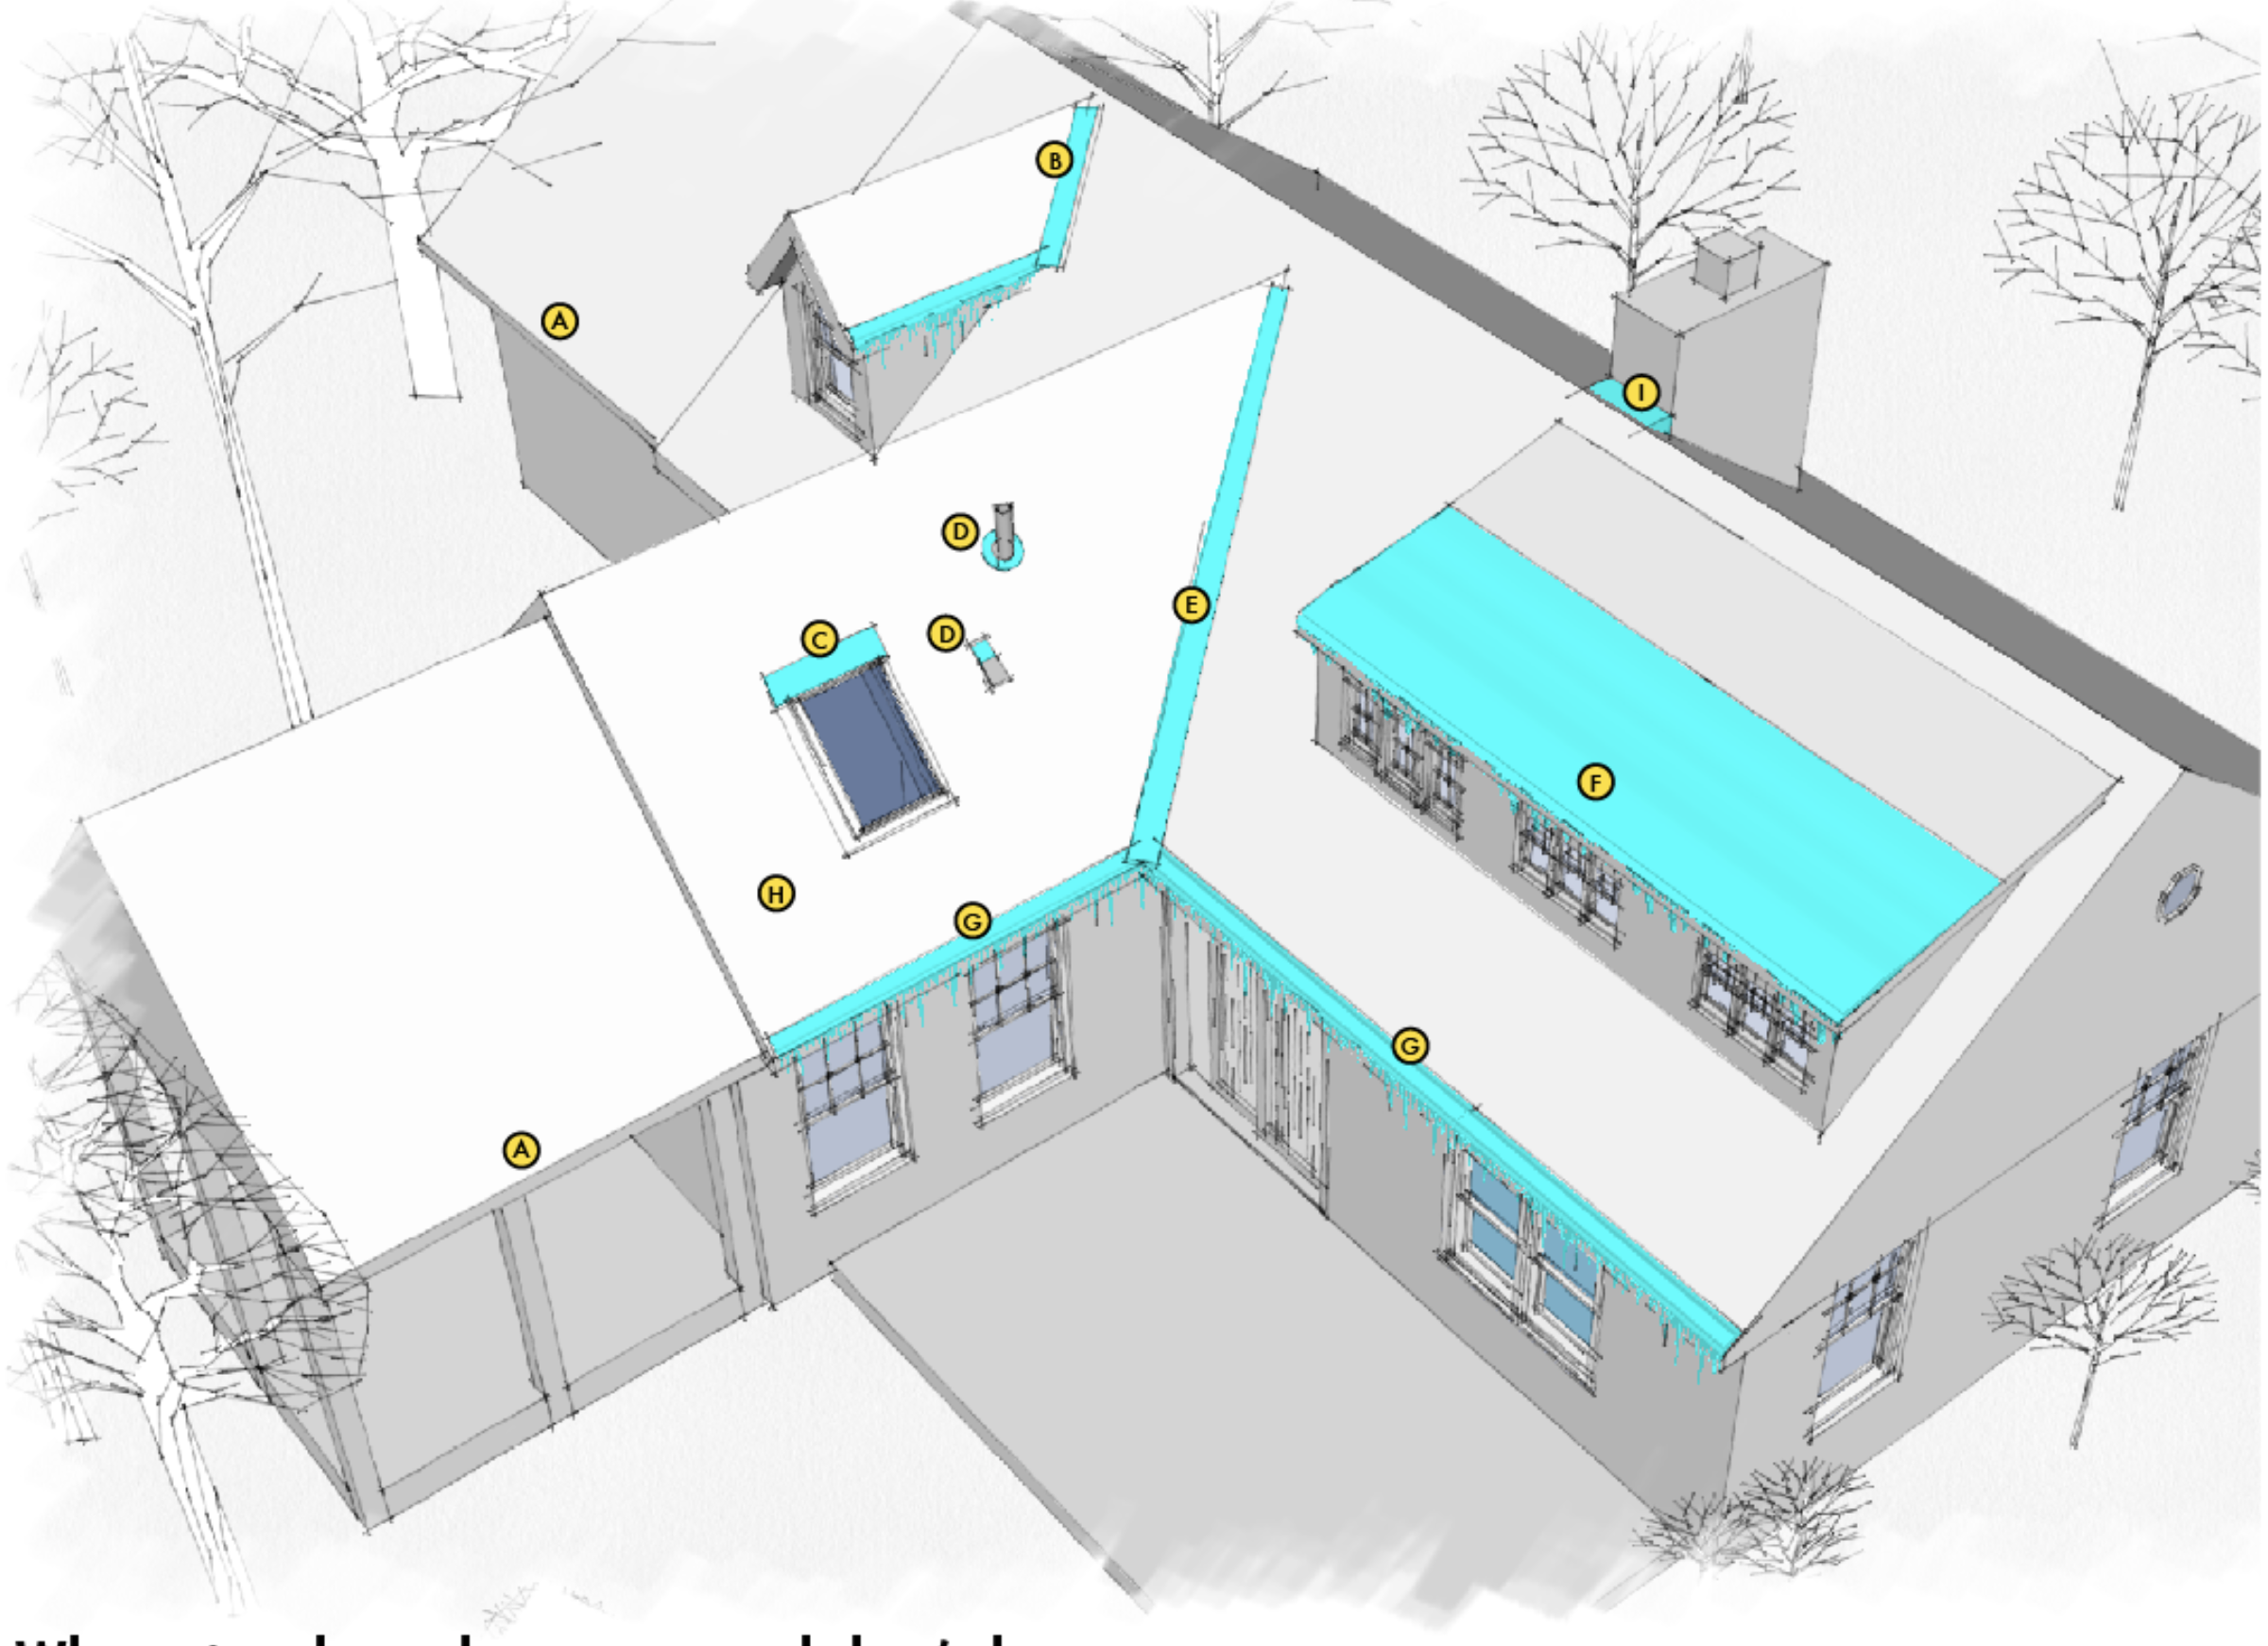
Ice dams are most often located on the lowest edge of the roof, commonly called the ‘eave’. They are also found in other, sneakier places such as above skylights and low slope shed dormers. For the most part, the majority of the heat cable jobs we install involve treating the eaves and gutters. Running cable in the typical “zig-zag” pattern along the eaves of areas prone to ice dam formation will eliminate leaks from ice dams by melting paths through the snow and ice, giving water the opportunity to leave the roof.
Gutters and Ice Dams
Speaking of gutters, I need to clear something up immediately. Gutters have NOTHING to do with the formation or severity of ice dams. Notice in the above illustration that the origin of the leaks caused by the typical ice dam does not change, with or without gutters. Put simply, if your home has bad ice dams and you have gutters, removing those gutters will have zero impact on the severity of those ice dams.

I know, because I have seen this attempted a number of times by desperate homeowners. Moreover, homeowners often make the mistake of thinking that installing heat cable in the gutters alone will help. It will not. Yes, it is smart to put heat tape in gutters to help water move off your roof and away from your foundation. No, installing cable in the gutters alone will not prevent damage to your home if ice dams visit.
How to Determine What You Need for a Roof and Gutter Heat Cable System
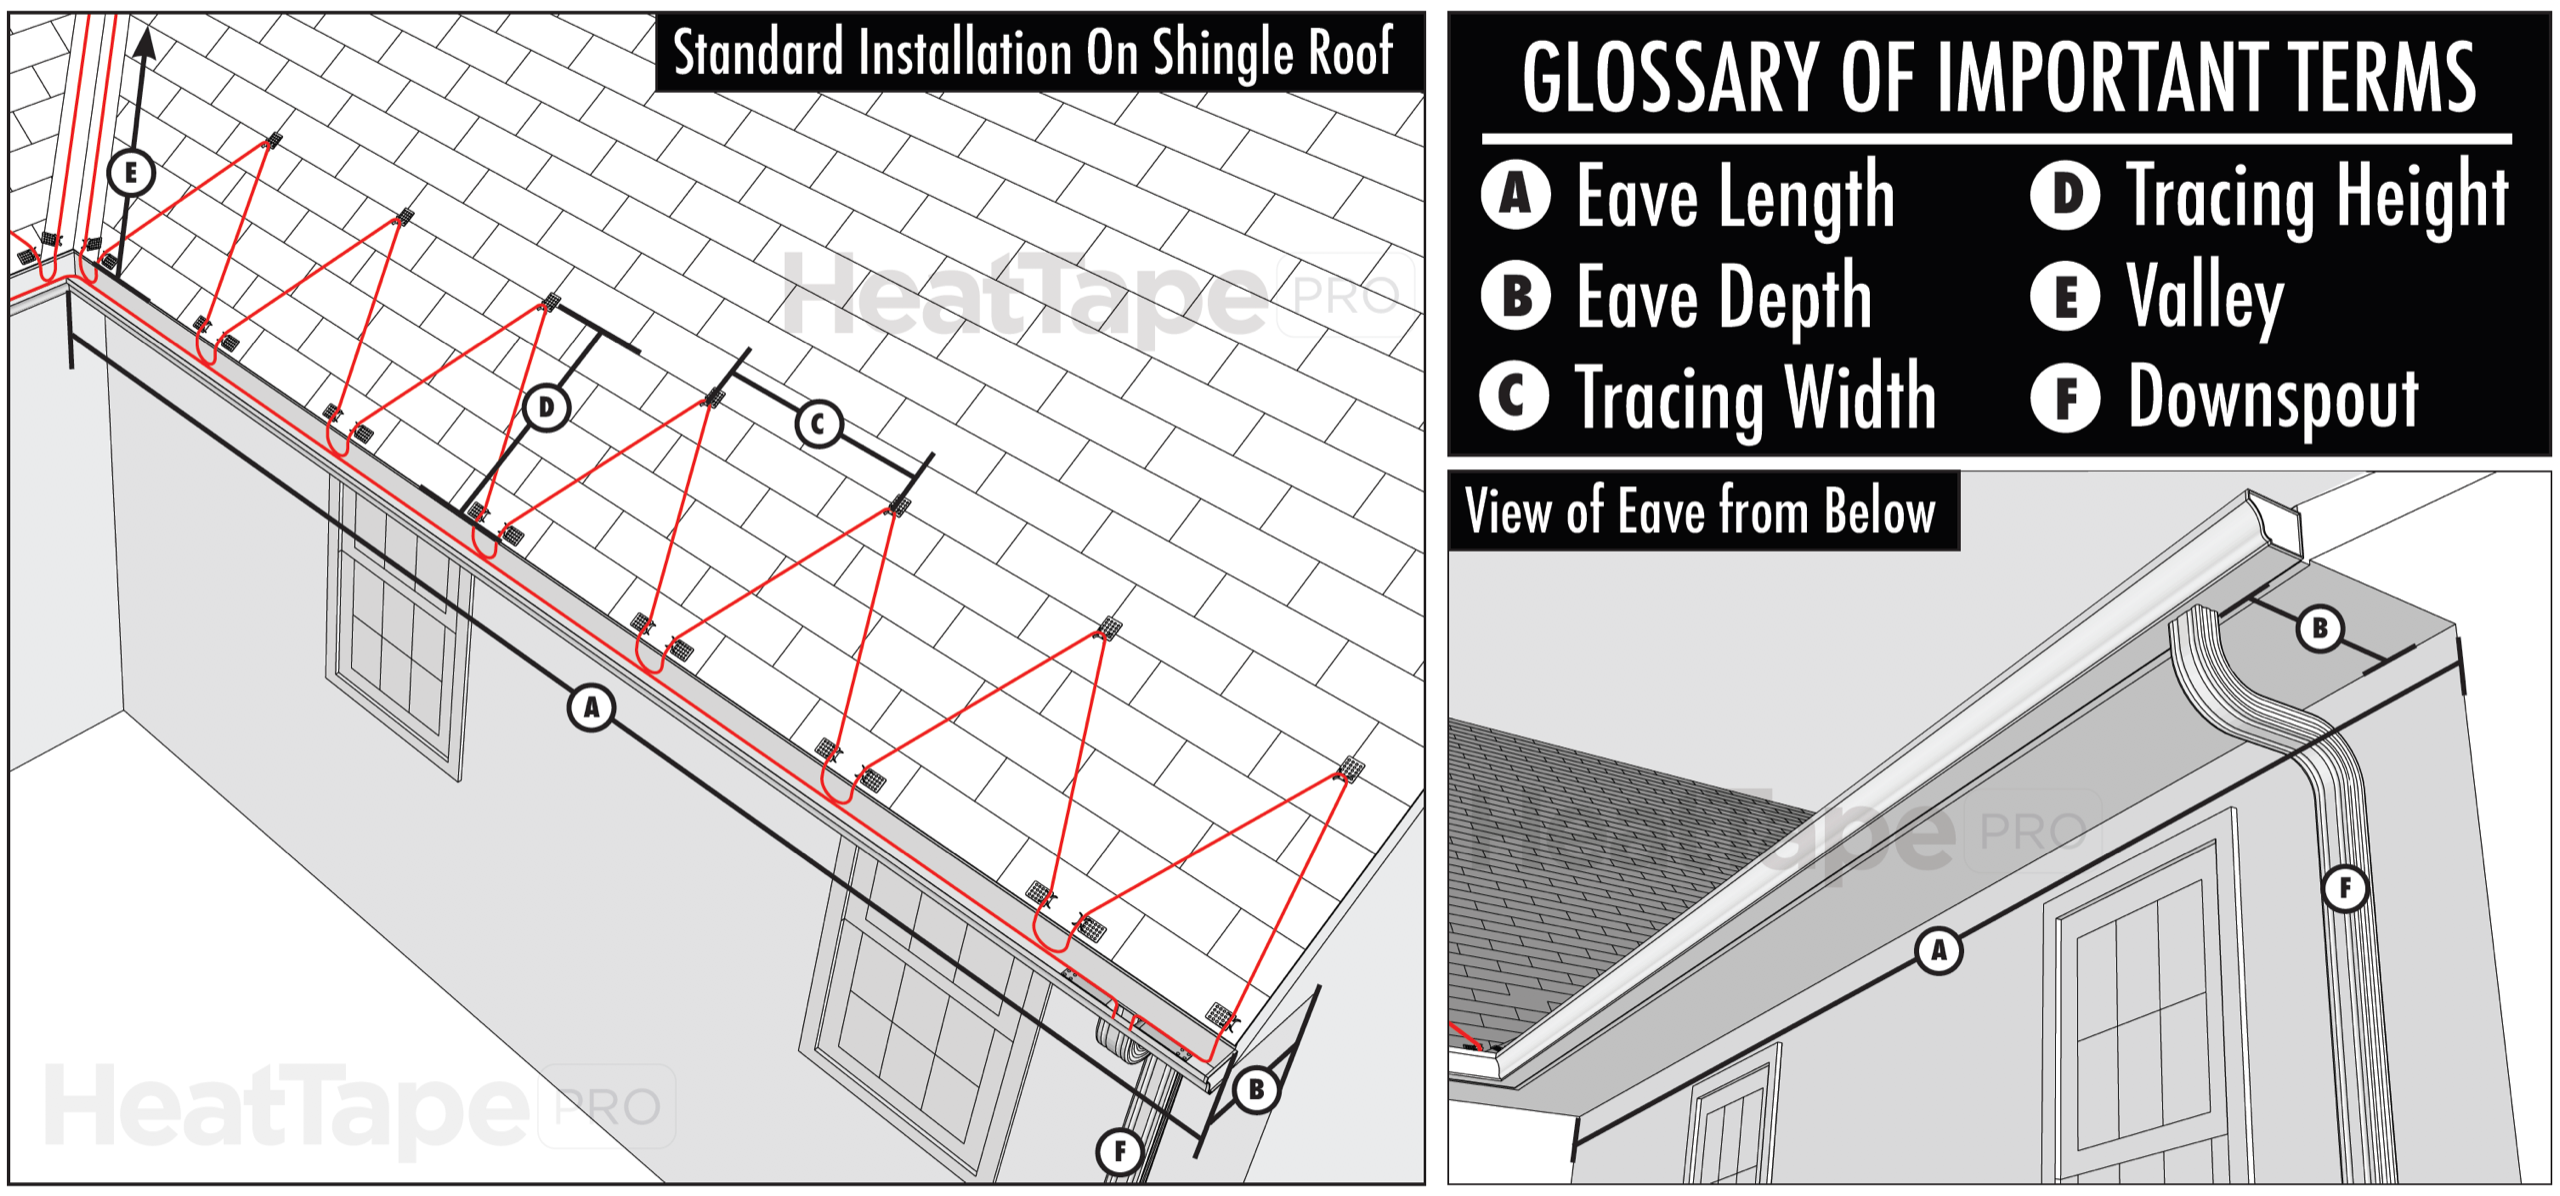
The simplest way to figure out the parts and pieces needed for your heat cable system is to plug in a few pieces of basic information into an online Heat Cable Calculator. Measure the length and depth of your eave. If you have gutters and a valley, plug in that info as well. No special skills or knowledge are required; just answer a few basic questions. The heat tape calculator will immediately tell you the cable length you need in addition to the number of heat cable roof clips required. It’s that easy. You can use this information to purchase any self-regulating heat cable system you like.
Which Heat Cable to Use for Ice Dam Prevention
As I described in great detail in Part Two of my ice dam prevention series, there are only two classes of heat cable one can use for ice dam prevention: Constant Wattage (Sold under the brand names EasyHeat or Frost King), or Self-Regulating (Sold under the brand names Heat Tape Pro, Raychem and Thermon). We install Heat Tape Pro exclusively, but Raychem Winterguard is another excellent self-regulating heat cable our installers have used in the past. To a large extent, it doesn’t matter which cable system you use as long as it is self-regulating and made by a reputable company. The limitations of constant wattage systems far outweigh their only advantage, cheap prices.
Roof Clips for Heat Cable System
The type of clip you will use for your roof and gutter deicing system will depend on the roof material on your home. The vast majority of heat cable is installed on standard asphalt shingles making the roof clip choice simple. The Grip Clip is the clip we use for all of our installations because it eliminates the need to drive nails or screws through your roof system. It also installs in about three seconds without the use of tools. We still use traditional nail-on clips for the installation of heat cable on rubber and metal roofs. Installers apply a dot of adhesive to the back of each clip before securing it with a nail or screw. We allow the adhesives to fully cure before installing the heat cable, a process that can take a few days or weeks depending on variables such as the roof material and the outdoor temperatures.
Heat Cable Installation: Some Tips and Tricks
Heat cable can be installed at any temperature but it’s generally easier at 30 degrees or above. Once you have your cable and clips in hand it’s time to roll up your sleeves and get to work. The tools required for the average install are quite basic: a putty knife and a ladder. A tool belt is handy to keep your roof clips readily available. Manufacturers provide installation manuals that describe the process in greater detail, but here is a summary:
1. Visualize Your Heat Cable Layout: The cable should be installed in a zig-zag pattern along all eaves you wish to protect. If you have gutters, it should be run in the gutters to give water an avenue to escape.
2. Power Source: If your power source is near the ground, plan on running the heat cable either up your downspout or up the side wall of your home. In the case of the latter, you can use standard wire staples from any hardware store to affix the cable neatly to the wall. Otherwise, your cable will run up the downspout in order to provide a path for water to use as it travels off your roof.
3. Use sidewalk chalk to lightly mark out your clip locations on the roof before installation. This extra step will help work through challenges like clip spacing before you commit to installing the clips and heat cable. Clip spacing often gets compressed near valleys and this is completely fine.
4. Install Grip Clips approximately 24” apart on both the bottom and top of your zig-zag pattern. You can install Grip Clips on the side of a shingle as needed to accommodate cable that needs to run vertically up the roof. The height of your pattern–how far up the roof the heat cable will travel–is determined by the depth of your eaves. The rule of thumb is that heat cable should go about 6 inches beyond the location of the exterior wall below. For example, if your eaves are 12” deep, you will want the heat cable pattern 18” up the roof.
5. If you have a valley, run the cable a minimum of 6 feet up and back down the valley. Use Grip Clips installed sideways on the shingles in the valley to keep the heat cable locked in place in the valley.
6. Stretch the cable out in the yard to remove any twists. This will make install much smoother. Run the heat cable from clip to clip, pulling the cable just tight enough to maintain a clean, tidy pattern on the roof. Pinch the cable into the ‘cradle’ of the heat cable clip. Do not pull the cable tight between clips as this will put unnecessary stress on the system.
7. There are few hard and fast rules in terms of installing self-regulating heat cable in gutters. There is no need to affix the cable to the gutter itself because it will do its job even if it is simply laid in the bottom of the gutter. One important note is that you should use a downspout hanger whenever the cable drops down into a downspout. This will provide protection to the cable against damage from the sharp edges and screws.
Heat Cable on Metal Roofs
We receive many requests each week for the installation of heat cable on metal roofs. Heat cable on standing seam metal roofs, corrugated metal roofs and screw-down metal roofs all require slightly different approaches. The same basic rules apply to installing heat cable on metal roofs as for standard asphalt shingle roofs (i.e., cable pattern, clip locations, etc.). The primary difference is the type of roof clip and how they are installed.
Installers around the country have used the same method for installing heat cable on metal roofs for years. Specifically, they use traditional nail-on roof clips with a combination of adhesive and screws to provide anchoring points for the heat cable system. It is permissible to use gasketed screws to affix these clips directly to the metal as shown in the PDF above linked to above when the roof system already has screws exposed. All of these methods are a little crude so we are currently in the development of some exciting new solutions to fastening heat cable to metal roofs (Coming early 2020!).
Summary
Heat cables have a dubious reputation in the ice dam prevention industry, mainly because people buy the cheapest cables possible and when they inevitably fail the entire concept of heat cables is discredited. Do your research to determine if the other ice dam prevention approaches I discussed in part one are viable for your home. If not, consider a high-quality heat cable. If readers were to take two critical points away from this three-part discussion on heat cables they should be: 1) Heat cable isn’t supposed to be a substitute for home improvements that address the underlying cause of ice dams and, 2) If you are going to the spend time and money on heat cables to prevent ice dams you should buy self-regulating cable from a manufacturer you trust.
If you are interested in learning even more about heat cables, a few weeks ago I sat down with Reuben Saltzman and his crack team to talk shop for his Structure Tech podcast.
Note from Reuben: I do not ‘accept’ guest blog post submissions. All guest blog posts found here are initiated on my end. I asked Steve to write about this topic after doing the podcast with him.
Author: Reuben Saltzman, Structure Tech Home Inspections
