I’ve discovered a dryer transition duct that is far superior to anything else I’ve ever seen – it’s called DryerFlex. I found this product while writing a recent blog post on dryer transition ducts, and I actually mentioned it at the end of that post. The DryerFlex dryer transition duct is a cross between foil and semi-rigid aluminum, but it outperforms both of those materials in every way possible.
The video below, made by the manufacturer of this product, does a good job of comparing this material to foil and semi-rigid dryer transition ducts.
At the end of the video, they say they’re confident this product will be rapidly adopted and become the industry standard.
After testing this product myself, I believe it.
To start my testing, I used the same test methods that I used to test the other dryer transition ducts – I filled the duct with shredded paper, started it on fire, then used a wet/dry vac to fan the flames. I also tested a rigid metal duct made from thin-gage aluminum, just for the heck of it. Rigid metal is approved by code to use as a dryer duct – not a transition duct, but an actual duct. I did this by connecting two two-foot pieces together.
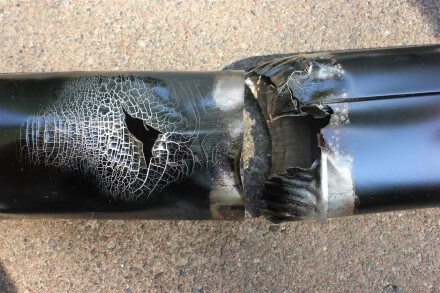
Solid Aluminum Duct
As you can see in the photo below, the solid aluminum duct failed where the two pieces connected together, but only after I had burned through most of the paper in the duct.
DryerFlex Transition Duct
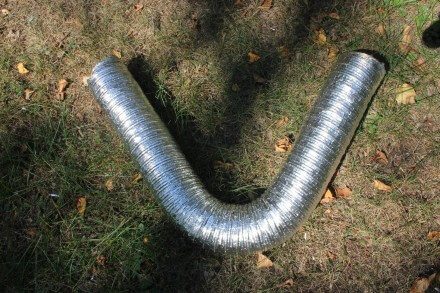
The results of my burn test with the DryerFlex duct were quite surprising… and unfortunately, I don’t have any good photos to show you. It was a very boring test, because I burned through all the paper and the DryerFlex duct never failed. I couldn’t believe it. The photo below shows the DryerFlex material laying on the ground after the test. I bent it up just to show that it was still capable of holding it’s shape.
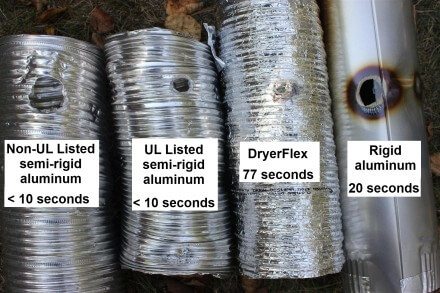
Because my testing method was subject to so much variability, I tried a more controlled burn test to compare different materials against the DryerFlex. I held a torch 2″ away from each duct and timed how long it took to burn a hole through the duct.
As you can see, the DryerFlex material outperformed the rigid aluminum duct by nearly a factor of four. That’s some tough stuff. Dryerflex is a far better dryer transition duct than anything that’s available at home improvement stores. The price is right too – at $6.60 for a 4′ section and $11.99 for an 8′ section, it costs about the same as the other products.
My only complaint with this product is that it’s not available at home improvement stores. You can only purchase this stuff directly from their web site, where you might pay more for shipping than you do for the actual product. If the manufacturer ever gets to the point of selling this stuff in home improvement stores for a comparable price, there would be no reason to ever buy a different product.
POST UPDATE 2/3/16: Dryerflex is now being sold under the GE name at Home Depot for $25. Unfortunately, nothing on the web site says “Dryerflex”, and the description does a completely inadequate job of selling this product. The Q&A section on their web site even includes a comically unhelpful answer from The Home Depot explaining why this product is so much more expensive than other dryer transition ducts. Check it out here: Model # PM08X10085DS
Reuben Saltzman, Structure Tech Home Inspections


Burning Dryer Transition Ducts | Structure Tech Home Inspections
September 11, 2012, 4:50 am
[…] Next year I might check out a product called DryerFlex. They claim their product offers the best of both worlds. We’ll see. Post edit 9/11/12: I tested it out, and it beat the pants off everything else. This is a far superior product. http://www.structuretech1.com/2012/09/dryerflex-a-superior-dryer-transition-duct/ […]
Jon Errickson
September 11, 2012, 5:12 am
Where there any markings on the DryerFlex to help identify it as DryerFlex?
Jim Allhiser
September 11, 2012, 5:18 am
Great stuff! I need to see a video of that stuff NOT burning.
Jamie and Adam would be proud!
Reuben Saltzman
September 11, 2012, 5:27 am
Jon – yes, it had black printing on it. Here’s a close-up view http://www.structuretech1.com/wp-content/uploads/2012/09/DryerFlex-Labeling.jpg . If you ever come across this stuff, you won’t mistake it for anything else. It’s very thick and sturdy compared to other materials.
Jim – Thanks! I’ll see about doing another test. My video got botched, and I only had one attempt at it.
Joe jones
September 13, 2012, 6:16 am
What about galvanized steel as a transition duct? Is that code? I have that now and did not need flex transition duct for my application.
JAMBR Inspections
September 15, 2012, 4:24 am
Mr. Reuben your blog posts are awesome knowledge sharing , I have read so many blog posts of your and learn so many new things from you and this one I liked the most…..
JimH
October 15, 2012, 8:21 am
Thank you for this information as I have been struggling to find a good solution. We currently have the flexible plastic which has been in place for 8 years. We just recently moved the dryer and discovered a hole that had been causing dryer lint to be trapped under the dryer and washer unbeknownst to us. We are probably very fortunate we haven’t experienced a fire. My problem is, I went and purchased a semi-rigid piece in the shortest length I could find at the home improvement stores which I believe was 6 or 8 feet. I was told it didn’t matter because I didn’t need to extend it all the way. However, there is very little room behind my dryer, and the vent to the outside is just barely offset from the location of the vent hole in the back of the dryer, both at floor level. So, I need something very short and very flexible to do the trick due to the small amount of space that this pipe needs to attach to the dryer, turn and attach to the outside vent. After fighting with the semi-rigid, and crushing it way too much trying to force it to work…and it forced itself out of the wall when I push the dryer back. So, currently I am still using the flexible plastic, but know it is very unsafe. What do you suggest?
Reuben Saltzman
October 15, 2012, 3:13 pm
Hi JimH – try something like this http://www.theignitorstore.com/product/Frigidaire-Dryer-Vent-Periscope-305926
JimH
October 15, 2012, 8:27 pm
That certainly looks like it could do the trick. I assume I would still want some semi-rigid or dryer flex pipe on each end to allow me to pull it away from the wall to service or clean…right? Are there short pieces available, or is it best to buy 8′ and cut a couple of short pieces? With flex pipe space may still be an issue.
Lastly, this seems like an option, albeit a pricey one:
“Repairman’s Tip: For those of you in condos or tight locations for your vent, simply get 2 of the 18-29″ kits and attach one to the wall. With the dryer pulled out, attach the other kit to the dryer, then push the dryer back and connect the 2 kits together with the enclosed clamps easily from the top of the dryer!”
Wouldn’t need any flex pipe, space doesn’t seem an issue, but 2 of those kits are about $50.
Which would you recommend, or have I misunderstood the proper use of the periscope (not needing flex pipe, etc)?
Thanks for the advice!
Reuben Saltzman
October 16, 2012, 3:37 am
Hi Jim,
I wouldn’t use any type of connectors. Just set up the periscope so your dryer pushes right up against it. When you pull your dryer away from the wall, you end up disconnecting your vent. That’s how I have my own clothes dryer set up, and it works quite well.
JimH
October 17, 2012, 7:15 pm
Thanks for the help Reuben!