This is a re-blog from two years ago with more details. I continue to get emails and messages from home inspectors and homeowners with questions about high-efficiency furnace venting details, which makes me realize I have a bunch of other stuff that still ought to be covered.
High-efficiency furnaces use PVC pipes to vent the exhaust gases out of the home, and manufacturers are very specific about how the installation should be done. As a home inspector, how far should I go to ensure the vent is installed correctly? Of course, I’d report on a vent that wasn’t vented to the outdoors. But what about a vent that terminates too close to an openable window? Maybe, right? And what about a vent that has too many elbows? I think this is where many home inspectors start to shake their heads and say this goes beyond our standard of practice… but why?
I won’t tell you exactly what a home inspector should or shouldn’t report on, but I will cover some of the most common defects that we come across as home inspectors, and I’ll also cover some of the more common questions that people ask.
Vent Terminals: keep them separate
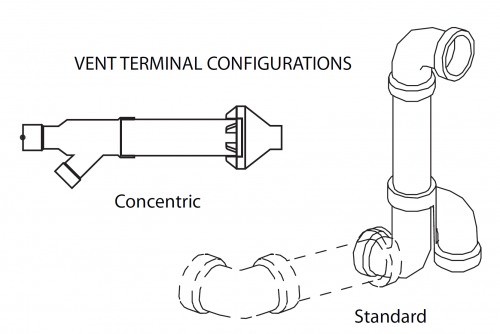
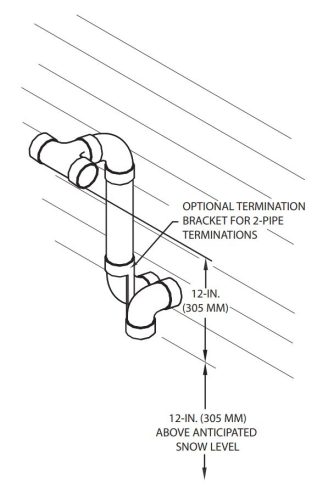
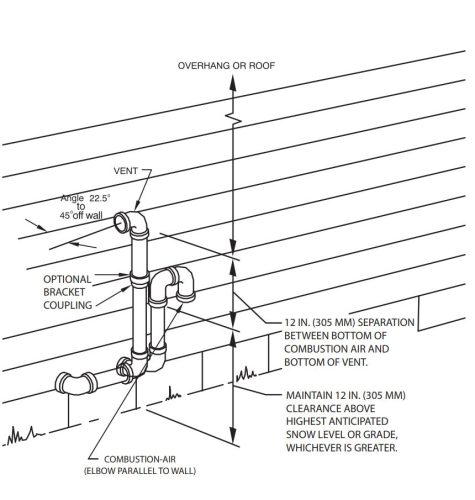
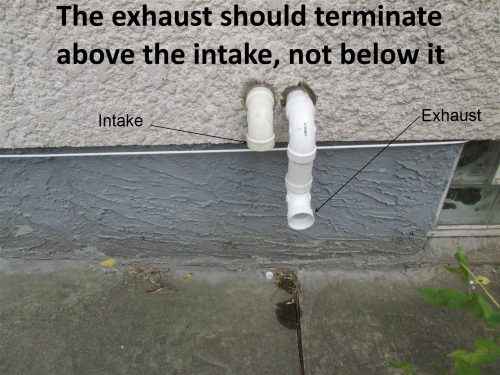
Most high-efficiency furnaces have two pipes coming out of the wall; one to bring combustion air into the furnace and the other to blow exhaust gases back out. It’s important for the exhaust gas to not get sucked back into the furnace, so manufacturers will usually give several ways to do this. One way is to make the exhaust terminate higher than the intake, usually by at least one foot. The warm exhaust gas rises, which prevents it from being sucked back into the intake.
Sometimes you’ll find a reducer at the terminal, which helps to increase the velocity of the exhaust gases. This also helps to get them out and away from the intake. Yet another way to terminate these pipes is to use something called a concentric vent terminal; this makes for a little bit cleaner-looking installation at the exterior because there’s only one single pipe exiting the wall. The intake and exhaust pipes join together inside the home, and the exhaust blows out the front while the intake brings air in from the backside.
When a two-pipe system is used, I ensure the intake is pointed down and the exhaust is never below the intake. The simple way to do this is to run the furnace and check the exhaust at the exterior; even if the pipes are labeled, installers sometimes get them reversed.
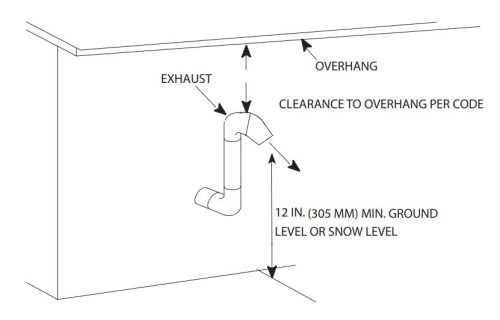
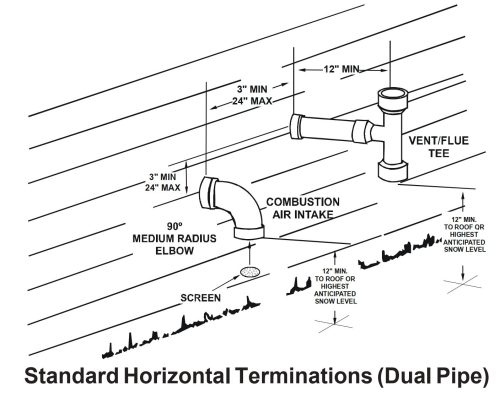
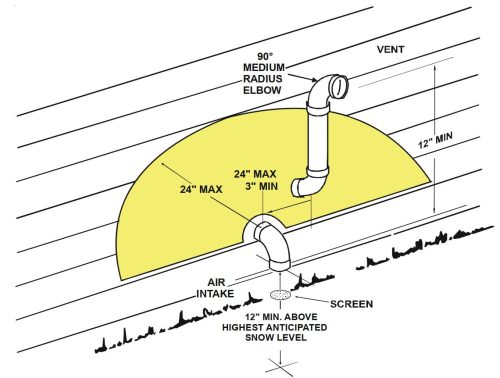
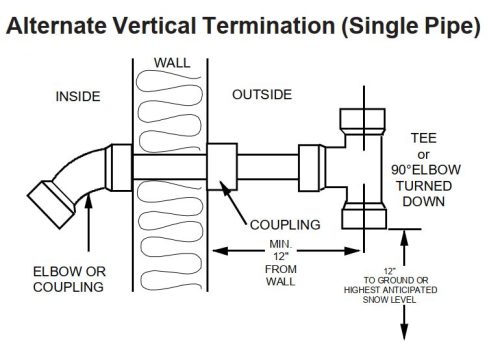
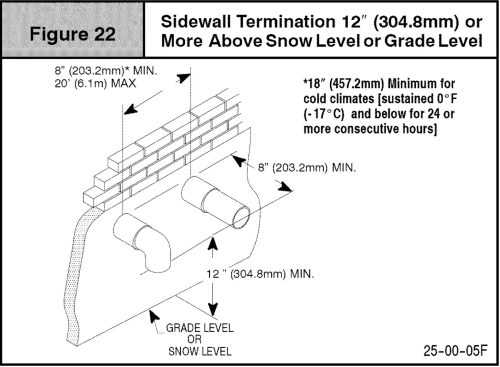
There are many acceptable ways to terminate these vents; if you’re looking at vent terminals and unsure if they’re right, you must read the installation manual. Here are a few examples of acceptable vent terminals from various manufacturers:
What do they all have in common? The intake points down, the intake is located 12″ above the ground or the highest anticipated snow level, and the exhaust is never below the intake.
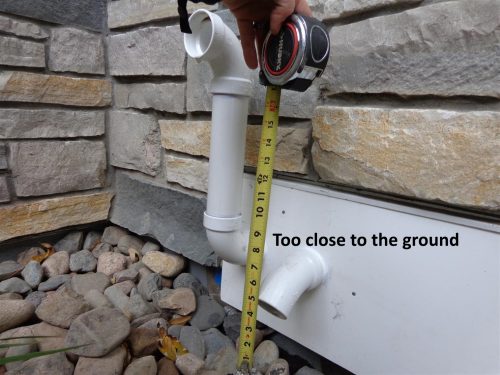
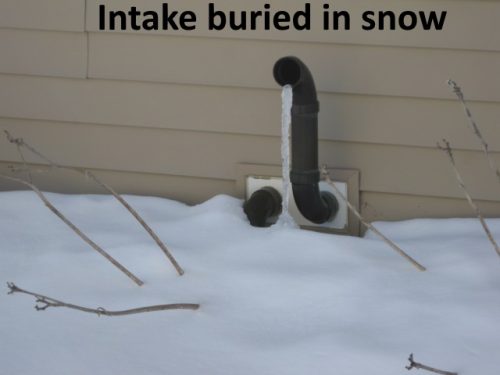
If a vent is located too close to the ground or too close to snow accumulation, the fix is usually to use two elbows to raise the vent terminal, as shown in many of the illustrations above. The photos below show a few improper installations:
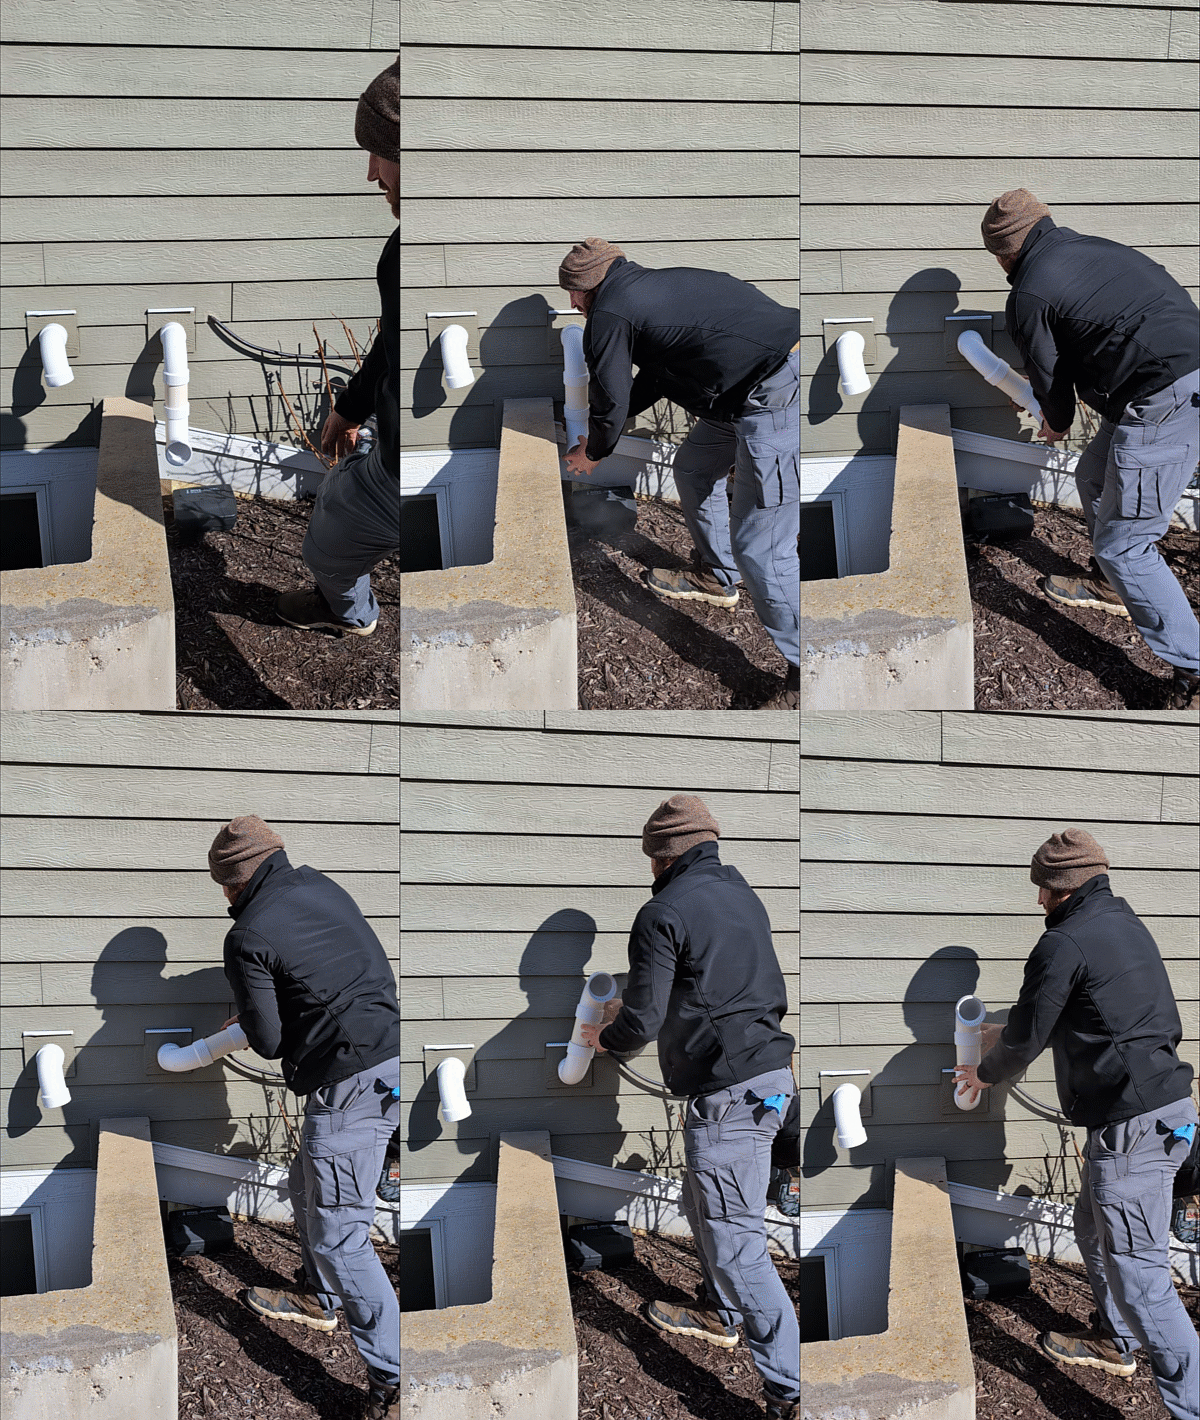
The GIF below shows a simple fix for this, assuming someone forgot to glue this joint and it simply fell down:
Can you install a screen at the vent terminal to keep out pests?
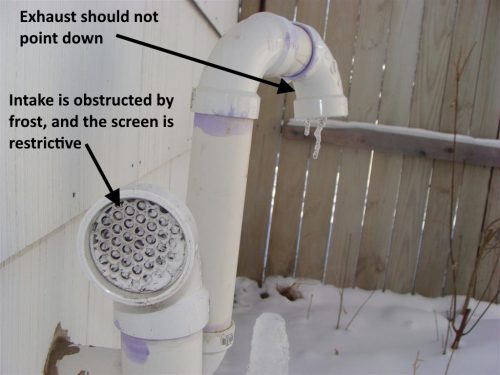
Maybe. It’s best to check installation instructions. A metal screen with 1/2″ mesh is surely fine to install on the intake for any furnace. But a screen on the exhaust terminal has the potential to build up with frost.
The photo below shows a couple of problems, which I’ve annotated.
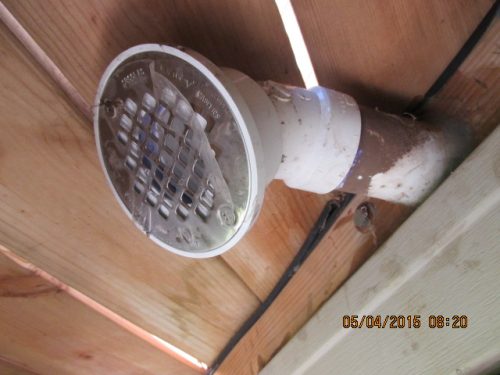
And this next photo shows a shower grate improperly installed at the furnace exhaust, which has a high potential to get closed over with frost.
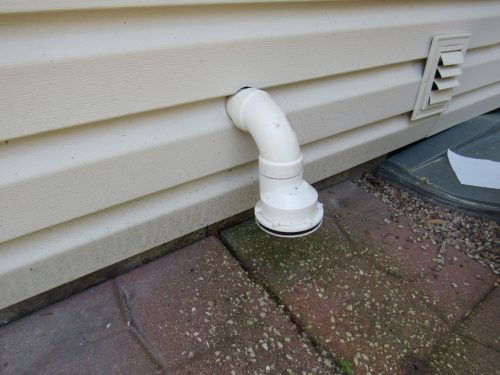
Here’s another shower grate on a vent that terminates way too close to the ground.
Vent Terminal Clearances
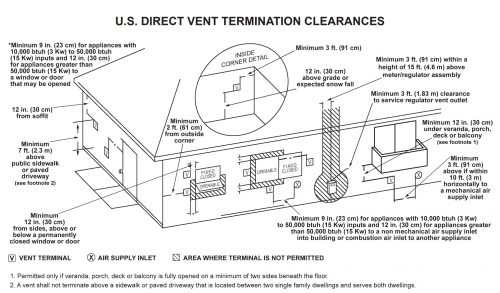
With a two-pipe system, also known as a direct vent, you’ll find very similar rules from manufacturer to manufacturer. You can find some version of the diagram below in almost every furnace installation manual, which nicely illustrates these clearances.
There’s a lot of stuff covered in this diagram, but here are some of the most common offenses. The vent must terminate at least:
- One foot from windows and doors
- Three feet from inside wall corners
- One foot above the ground or the anticipated snow level
- One foot below porches, balconies, and decks
If you have a single-pipe (non-direct vent) system, the furnace takes combustion air from inside the house. Because of this, the rules regarding clearances around windows and doors are more strict, but they’re not wildly different.
Vent Pitch
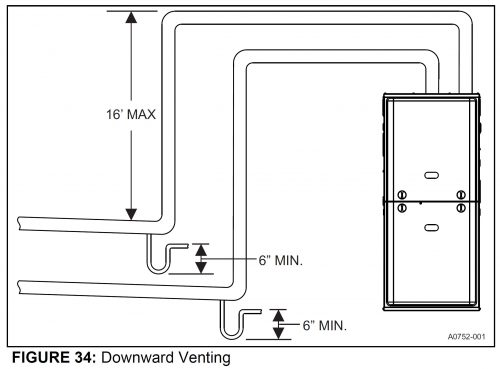
Vents should be pitched so condensate will drain down into the furnace. There should be no flat sections of venting, no dips, and no sags… but never say never. I recently ran across some installation instructions that allowed this, provided a drain was installed at the low point.
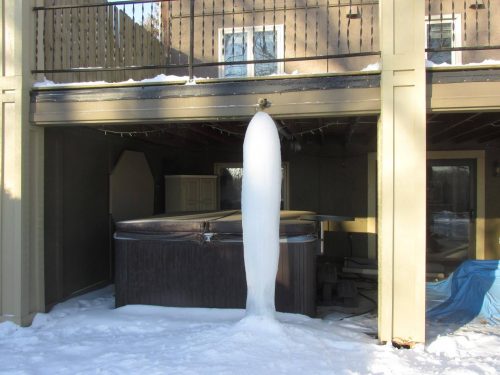
I’ve never actually seen this done, but it makes perfect sense. And the vent should never pitch downward away from the furnace towards the outdoors because this can lead to big, unintentional ice sculptures during the wintertime.
Vent Sizing
Every furnace installation manual has a bunch of daunting tables to figure out what size pipe is needed. They consider the altitude, the furnace size, the length of pipe, the number of elbows used, and the type of elbows used. I don’t make a habit of trying to figure all that stuff out and do all of those calculations. Instead, I use this general guideline: if the furnace is 80k BTUs or smaller, 2″ pipes are probably fine. If the furnace is 100k BTUs or larger, we probably need 3″ vent pipes.
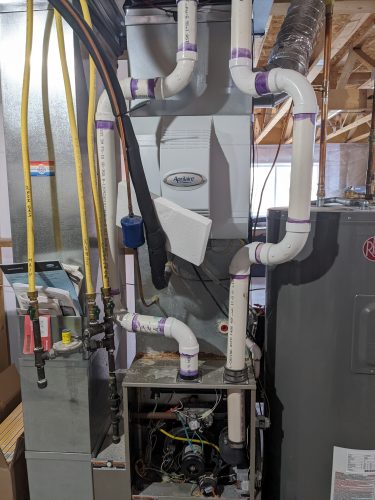
A few yellow flags that would make me question the vent size would be a 100k BTU+ furnace with a 2″ pipe, or a pipe with an unusually long equivalent length. The equivalent length factors in the overall length of the pipe, as well as the type and number of elbows used. The photo below shows a good example of a furnace installation that we recently questioned.
It’s quite clear that the humidifier was installed after the furnace, and the installer had to make a bunch of extra bends in the venting to make room for it. This was a fairly large house, which meant that had to be a fairly large furnace, which made us wonder if the 2″ venting was large enough. So we pulled out the installation manual and looked it up.
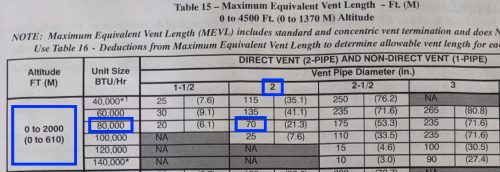
As it turns out, this was only an 80k BTU furnace. The manufacturer allows for 70′ of piping, subtracting somewhere between 3 and 8 feet for every 90, depending upon the type of 90.
There was a mix of 7 medium and long sweep elbows (3 not pictured), but just to be quick and conservative, we assumed they were all medium sweeps, so we calculated a total of 35′ for the elbows. Add the remaining rise to the ceiling and then out of the wall, and we had far less than the maximum allowable length.
In other words, there was no problem here. But if this had been a 100k BTU furnace, the elbows alone would have been enough to need 3″ venting. This is a good exercise to go through when we see something out of the ordinary, and it only takes a couple of minutes.
Unconditioned Spaces
It’s acceptable to run furnace venting through unconditioned spaces, like an attic or under a deck, but it might need to be insulated to help reduce condensation. In extremely cold situations, the vent may cool down so much that the terminal could freeze over with frost. Also, manufacturers may limit the amount of exposed vent pipe. You have to read the manual, and maybe use a table like the one below.
Why aren’t furnaces vented through the roof?
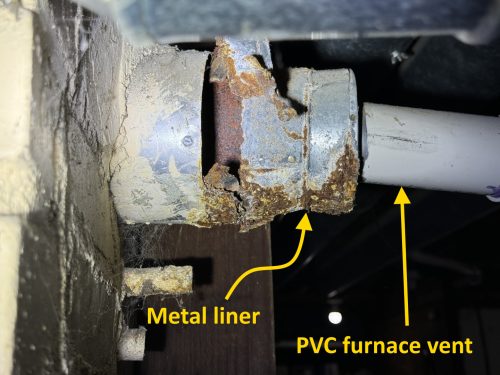
Older category 1 furnaces used to vent through the roof. But on most furnace retrofits, where a high-efficiency furnace is being installed in place of the old one, it’s cost-prohibitive to vent a new furnace through the roof. The problem is that you can’t use the old metal vent; you need to use plastic because of the high level of condensation that will happen inside the vent. If you try to vent a high-efficiency furnace into the existing vent, it’ll rust the metal away very quickly and it probably won’t draft properly. The photo below shows what could happen.
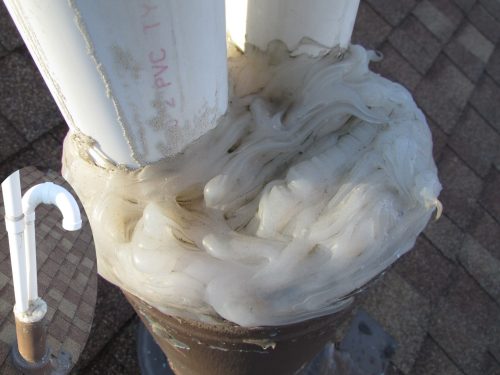
The PVC vent for the furnace needs to extend all the way to the exterior. In some rare instances, the old metal vent can be used as a chaseway for the new PVC pipes, but there’s usually not enough room for this. The photo below shows an example of this.
The installer wasn’t sure how to seal off the top of the vent to the elements, so they emptied a tube of silicone onto the top.
As irritating as it might be for some people to have the furnace vent out through the side of the house, this is usually the best option for an existing home.
Conclusion
If you want to know if your high-efficiency furnace venting is properly installed, you need to read the installation manual.



Bill Wells
March 10, 2025, 8:23 am
Wow, thank you. Getting a new furnace installed soon, Wanted to get info on routing of vent piping. I plan to meet with installer to discuss routing before installation.
Don’t understand the “three feet from inside wall corners” requirement.
Reuben Saltzman
March 10, 2025, 9:50 am
Hi Bill, if the intake and exhaust are too close to an inside corner, the exhaust gas could get sucked back into the intake.