What’s the best way to insulate your attic? I started out last week’s blog post with that question and never got around to the answer. By the time I was finished with that post, I realized that I had two different topics to cover; insulation types and insulation methods. Last week’s post was about insulation types, this week’s post is about insulation methods.
The Gold Standard
For a traditional attic, there is no need to use foam insulation throughout the entire space, as you’ll get the most value out of the first couple inches. A cost-effective way to use foam insulation is to foam the lid of the house, then use loose-fill insulation on top. This means installing closed-cell spray foam to a depth of at least 2″ on the entire attic floor to completely seal everything up and create a vapor barrier. After the foam has cured, loose fill fiberglass or cellulose insulation gets installed on top of the foam. My preference is cellulose, but either is acceptable.
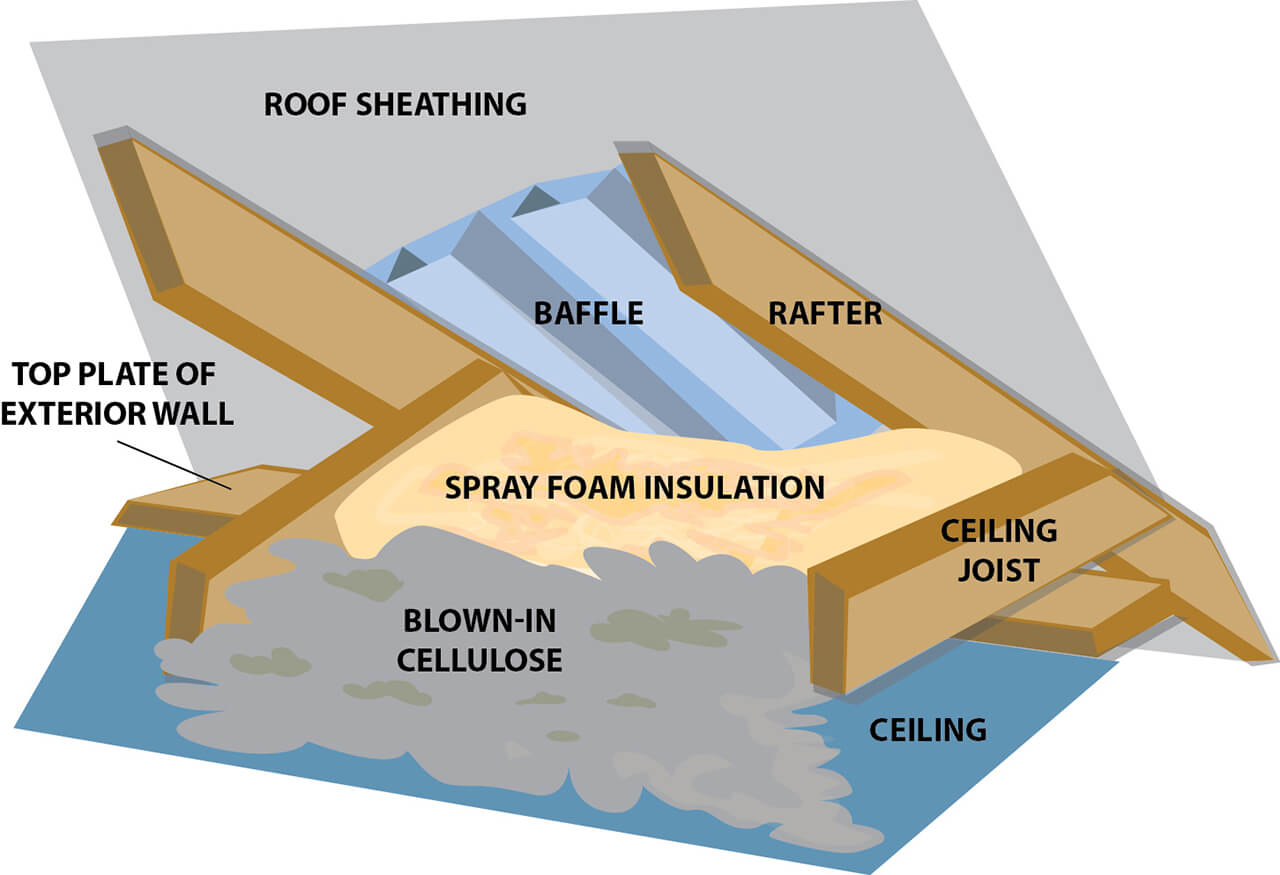
On an older home with only a few inches of space between the tops of the outer walls and the roof, there won’t be much room for insulation here. Extra spray foam needs to be installed in this area to help compensate for the lack of space. See my blog post on this topic for more info: Poorly insulated eaves at old houses. The illustration below, provided by the Minnesota Department of Commerce, Division of Energy Resources, shows what this method looks like.
As I mentioned in last week’s blog post, the minimum insulation value in an attic for new construction here in Minnesota is R-49. How many inches of insulation is that? Who knows. Different manufacturers of insulation have different R-values. Just check out the examples below from different manufacturers of loose-fill fiberglass insulation:
The Silver Standard
This is typically the most cost-effective option for homeowners and is the most common recommendation from insulation contractors. This requires major attic preparation before installing insulation. The insulation contractor must seal up all attic bypasses before adding insulation. Foam-in-a-can is great stuff for most smaller attic bypasses, but watch out for gas vents; they require 1″ clearance to combustibles such as spray foam.
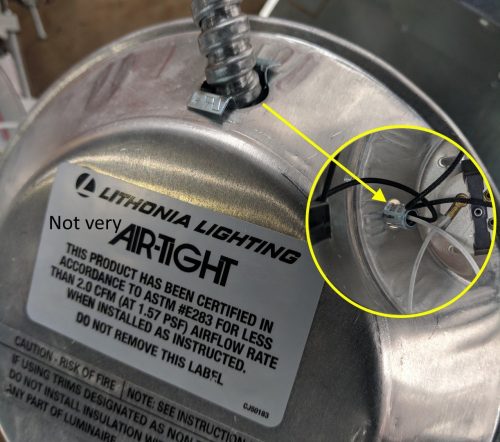
Insulated boxes must be constructed for any recessed lights because they contribute a ton of heat to the attic and they’re leaky. Even the “airtight” recessed lights are anything but. Just check out the recessed light below. You’d think there was a missing gasket or something, but no. That’s just how it comes.
If you don’t like the idea of making your own boxes, you could also purchase pre-made recessed light covers, such as those made by CanCoverIt. I recently used a bunch of those on a recessed light project in my own attic, and they were very easy to use.
If it’s an older home where the rafters or trusses only leave a few inches for insulation at the outer walls, do what I showed above with spray foam at the eaves. Of course, don’t forget to install baffles at the eaves to prevent your soffit vents from getting blocked.
After everything has been prepped, it’s time to insulate. Fiberglass or cellulose insulation are typically what get used.
The Bronze Standard
Have an insulation contractor seal up the most obvious attic bypasses; plumbing vents, recessed lights, furnace vent, chimney, etc. Once that’s done, have cellulose insulation added to the attic. Cellulose does a good job of controlling condensation in the attic and it’s a fairly dense product, so it will cut down on air movement from attic bypasses, but won’t completely eliminate them.
The Brown Standard
Roll out a bunch of fiberglass batts, proudly proclaim “done and done”, and stay the heck away from my kids.


