One of the things that us home inspectors love about our job is that we get to point out what’s wrong, recommend repairs, and then we’re done. We don’t have to worry about exactly how the repairs are going to happen, and we’re not the ones that have to do the work.
When we take on our own home improvement projects, we don’t have that luxury. We’ve gotta do it right, and figure out how to get there. I rarely tell personal stories, but here goes one. This is a blog, after all.
 I moved into my home in Maple Grove about four years ago. It had an unfinished basement when I moved in, and the basement is still unfinished today. I’ll get around to finishing it someday, maybe, but for now this space serves as my office and exercise area, and I spend a lot of time down here. There’s a rough-in for a bathroom, which consists of drains and vents for a toilet, sink, and shower or bathtub. Pretty standard stuff for any newer home with an unfinished basement.
When I finish off my basement I’ll add a bathroom, but I thought it would be great to have a urinal and a sink down here in the meantime. I figured that since the drains and vents had already been roughed in, all I’d have to do would be to run some water lines over, connect the fixtures, and I’d be all set. It shouldn’t take more than a few hours, and would be a temporary installation, but I’d make good use of the fixtures while they were installed. I’ve thought that ever since I moved into this house, but I finally took action a few weeks ago.
I had been passively looking for a used urinal on Craigslist for many years, but I was going to be home alone for a few days, and that was my chance to get a project done. You know, a nice surprise for my wife when she got back. To get things moving along, I went online and special ordered a urinal from Home Depot for $118, and a flush valve for $92. For the sink, I went on Craigslist and found someone selling a sink base, sink top, and a faucet for $50.
I got the project done, but it took me a little while longer than I had planned. I’m sure any good plumber could have knocked it out in a few hours, but I’m not a good plumber. Heck, I’m not even a bad plumber. I know wrong when I see it, and I know how stuff is supposed to look when it’s right, but installing a urinal is brand new territory for me.
Water flow
First off, I spent way too much time installing the water supply lines. Urinals with direct flush valves require at least ¾” water lines (see section 4715.1730 of the Minnesota State Plumbing Code), because there needs to be sufficient water flow to get a good flush out of the flush valve. It’s not like a flush tank, where a large amount of water is available to quickly dump.
Whenever I see PEX tubing installed, I’m a little annoyed at the number of fittings that are used. Every one of those fittings restricts water flow, and part of the really cool thing about PEX tubing is that it’s flexible. You shouldn’t have to use a bunch of fittings to get the PEX tubing to go where you want it to go.
So of course, I killed my back standing on a ladder bending and pulling ¾” PEX tubing through my floor joists and through the top plate of my wall. Check out the photo below; you’ll notice there are no fittings used.
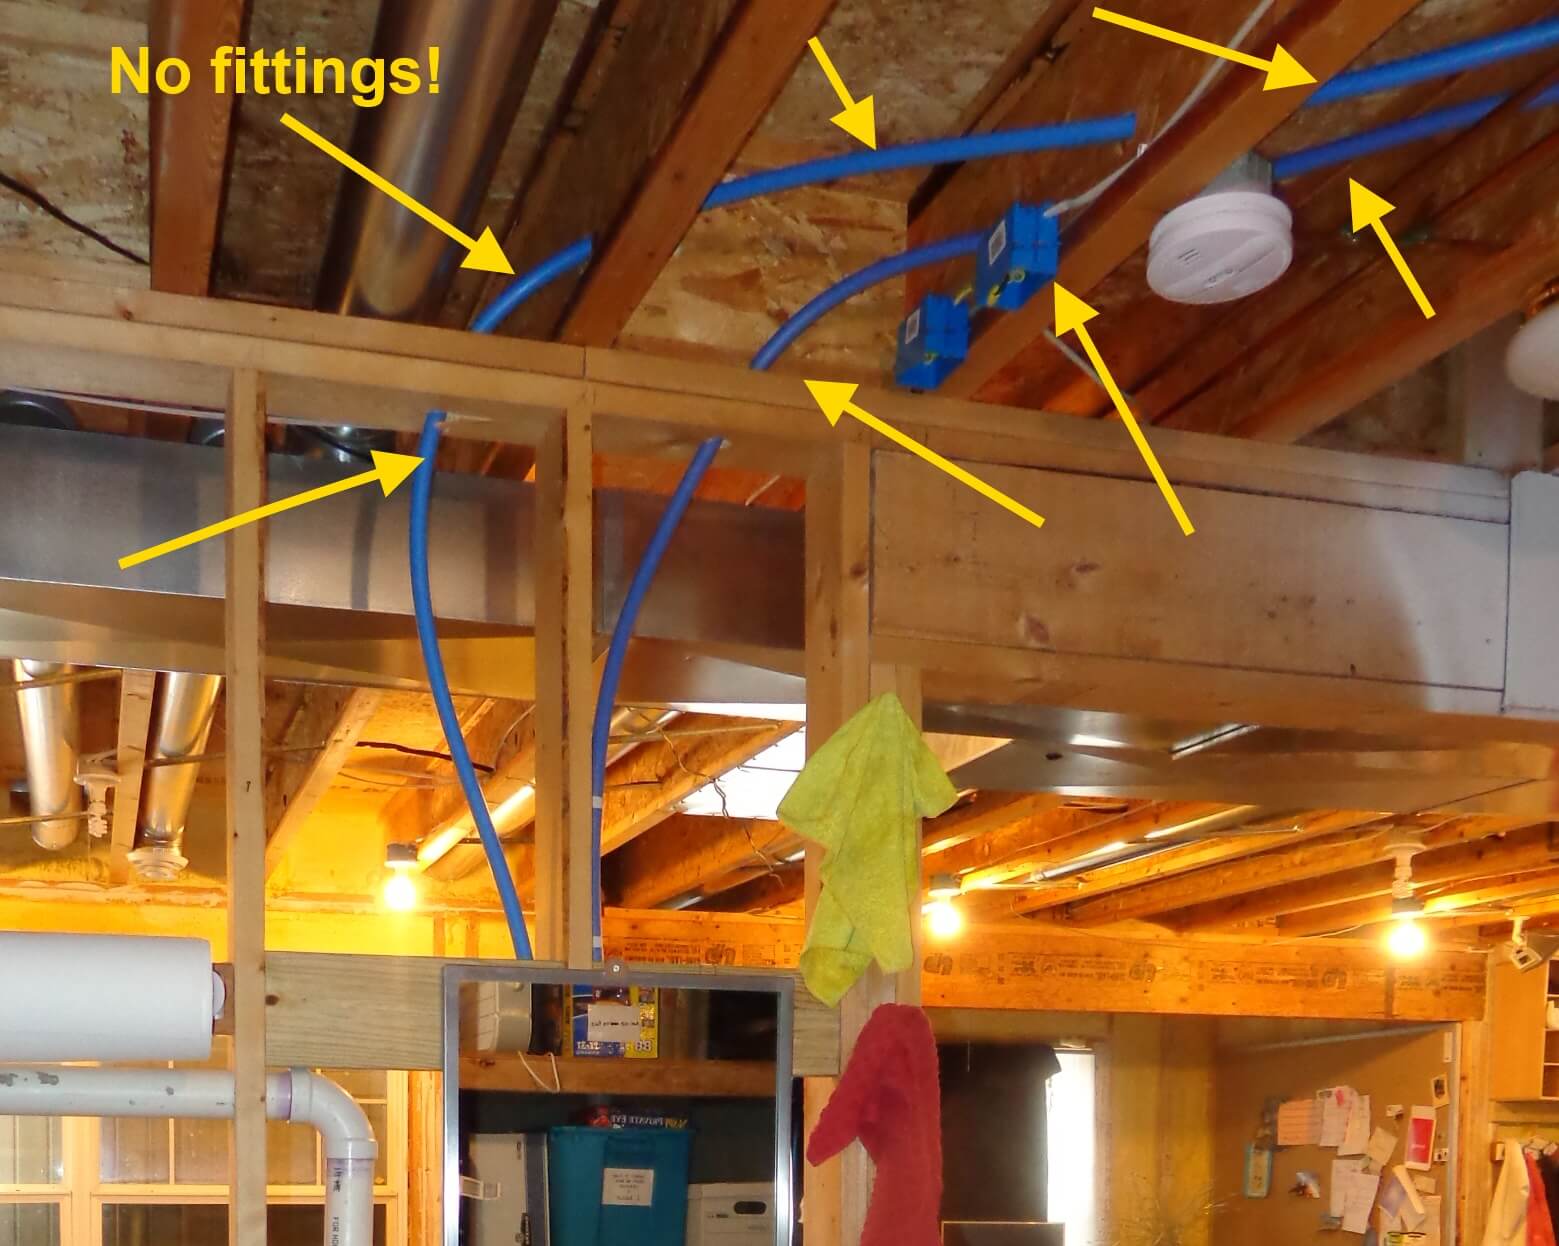
I was tempted to use 90-degree fittings to get the PEX where I wanted it, but I persevered and got it all pulled through with no fittings, just to make absolutely certain that I wouldn’t have to worry about water flow. It turned out to all be a waste of time and effort.
Once I gave the urinal the first test flush, water came out so fast that it shot right over the end of the urinal and all over the floor. I adjusted the flow on the valve down about hallway, and the same thing happened again. I adjusted it down again… same thing. I ended up adjusting the flow all the way down to nothing, then gave the adjustment screw a quarter turn open. That was about perfect.
Lesson learned: plumbers know what they’re doing. Fittings in PEX aren’t a big deal. The water flow probably would have been fine with a hundred fittings installed.
Boring holes
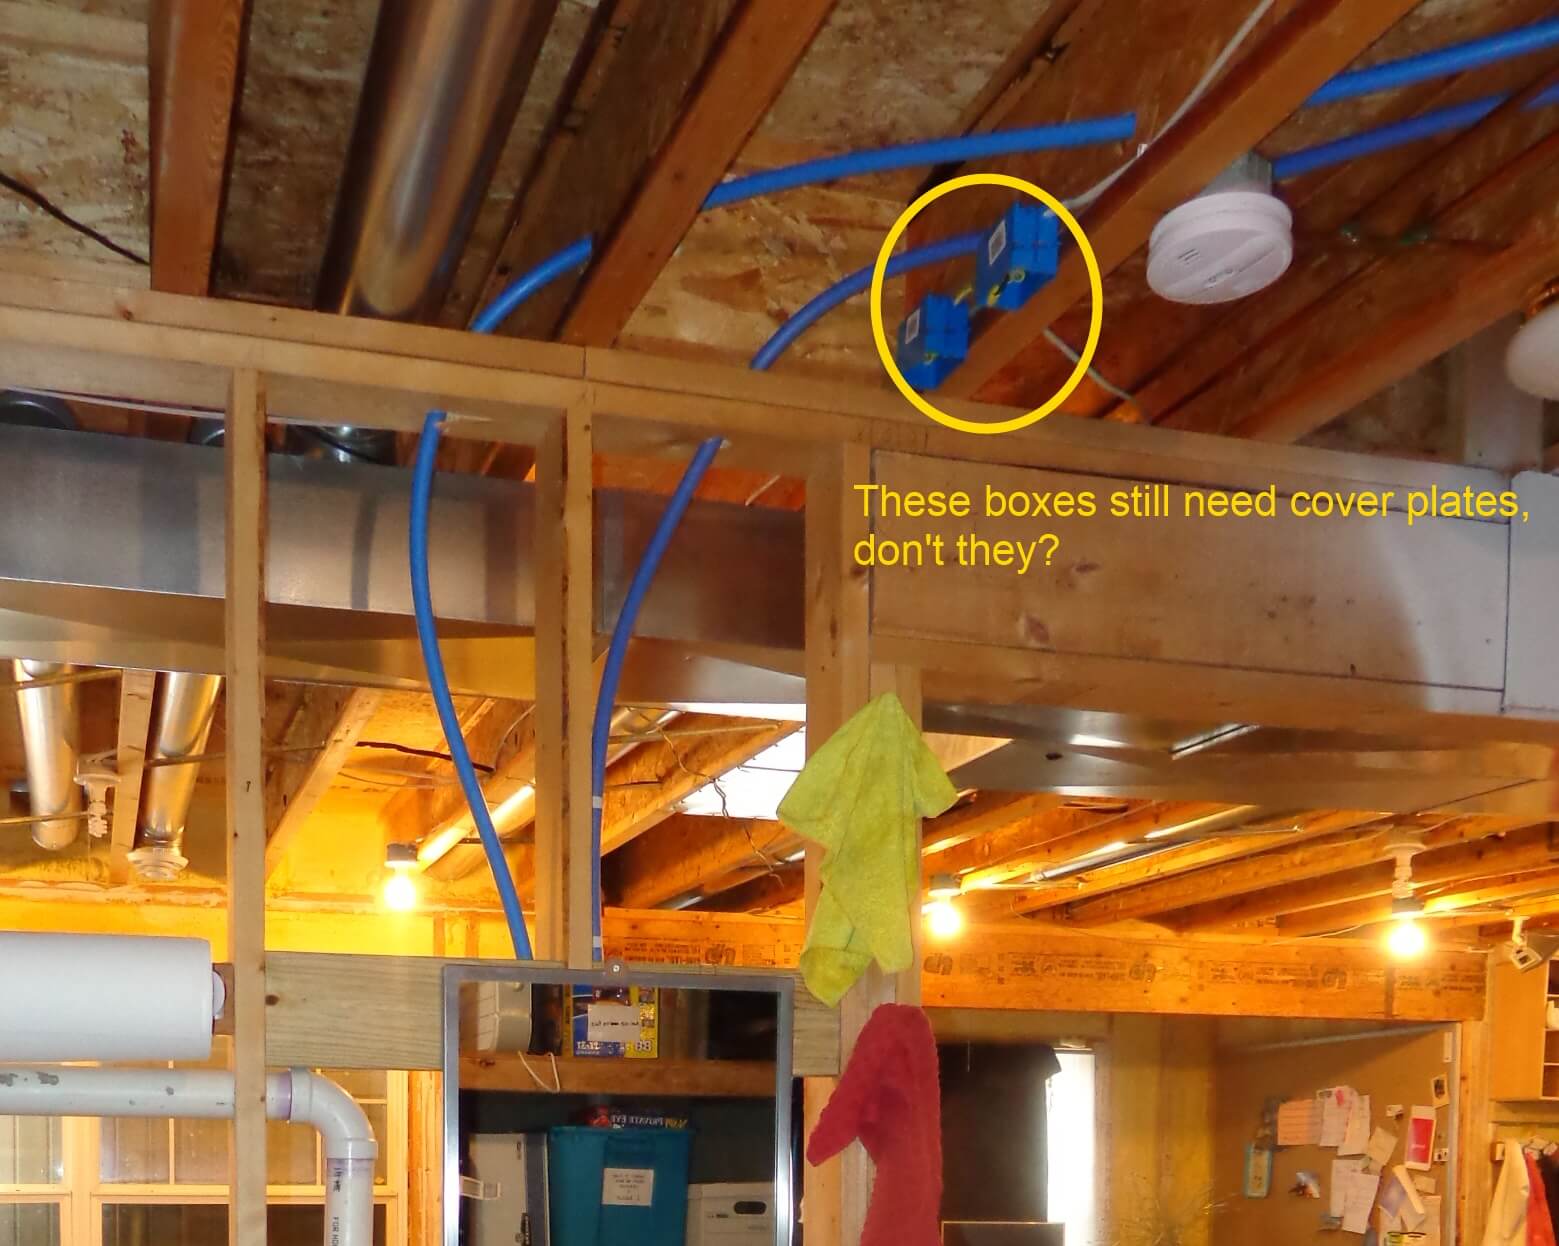 While making the bore holes in my floor joists for the water lines, I made sure to stay the heck away from electrical wires. Or at least I tried. I made note of some wires that were in the path of where my water lines needed to go, pushed them aside, stapled them up out of the way of where I would be drilling, and drilled through my joist into the back of another wire I forgot about that was on the other side. Duh. Ultra-rookie mistake.
The good news was that my circuit breaker did its job and tripped the circuit, and I only put a tiny nick in the tip of my drill bit from the electrical arc.
So that’s what the two junction boxes at the ceiling are all about. Lesson learned: look twice, drill once.
Watch it, sparky
I wanted the water pipe coming out of the wall for the urinal to be sturdy, and the right way to do this would be to use a ¾” drop ear elbow, but all that I could find at Home Depot, Menards, and Lowes were the ½” fittings, so I stubbed out some ¾” copper tubing and fastened the tubing to one of the wall studs with a few home-made brackets. Not perfect, but it worked pretty well and the pipe doesn’t budge. One of my screws ended up protruding through the wall stud a little bit, so I got my angle grinder out and used it to cut the screw off flush.
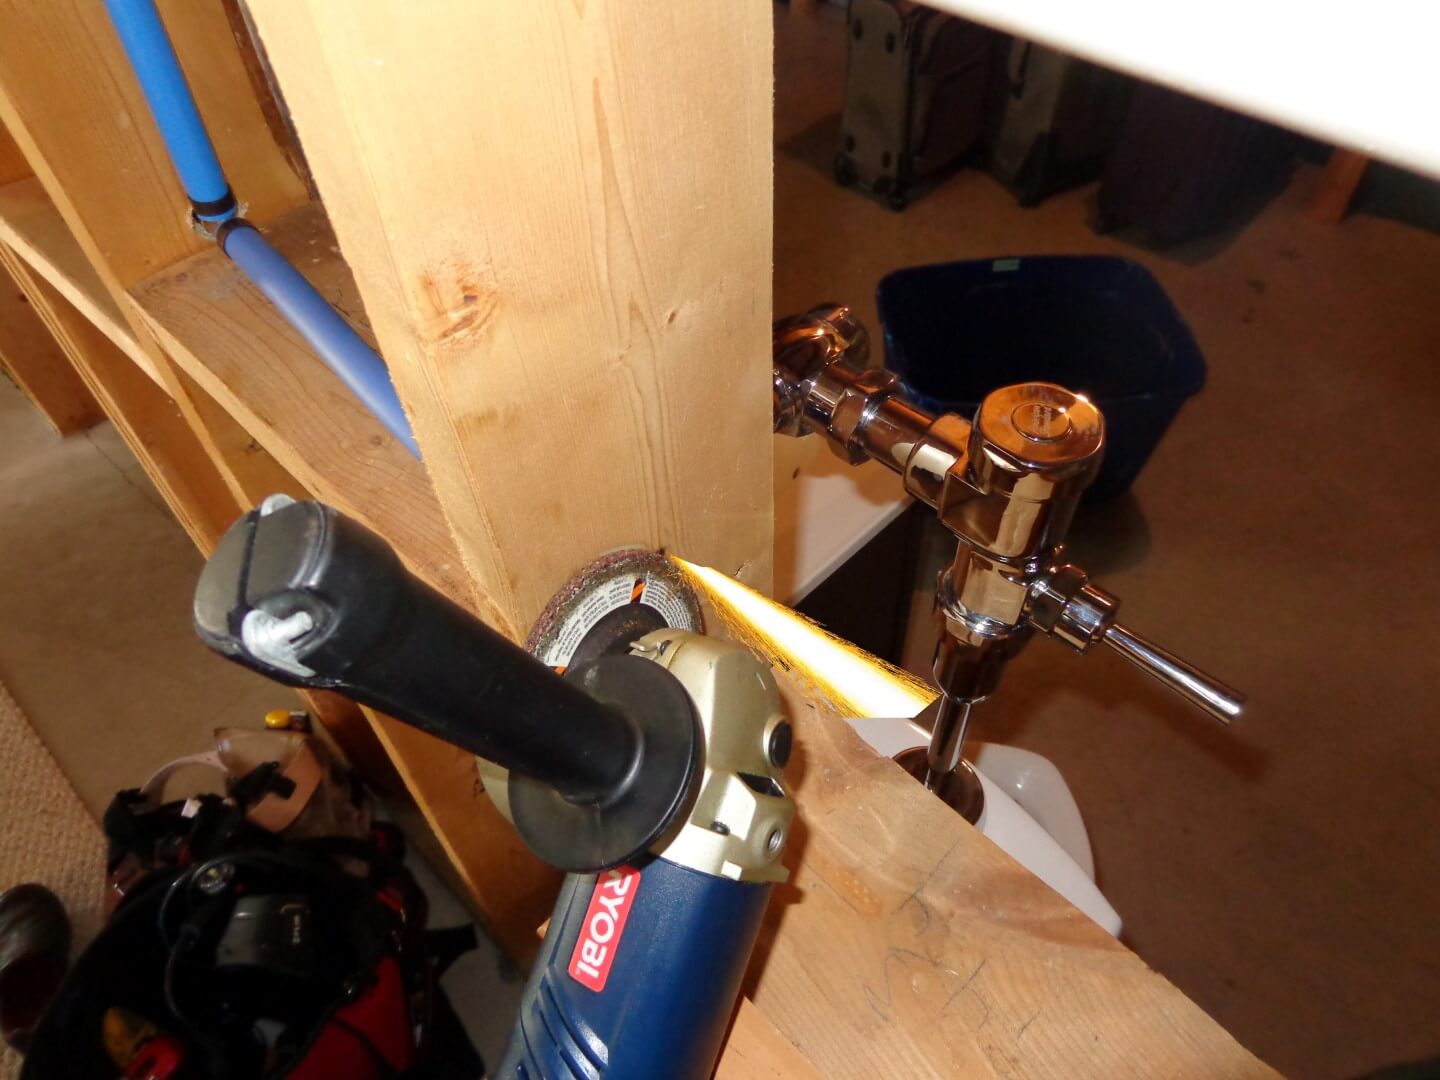
I didn’t worry about the shower of sparks shooting out from my grinder onto the new urinal until I noticed a million little black flecks that showed up on the top of my brand-new urinal that wouldn’t come off.
After coming up with no solutions on Google, I used Scotchbrite pads, SoftScrub, and about a half hour of very hard scrubbing to get the black flecks to nearly disappear, but they’re still not completely gone, as you can see in the photo below. It almost looks as though the surface of the porcelain is pitted, but it still feels perfectly smooth.
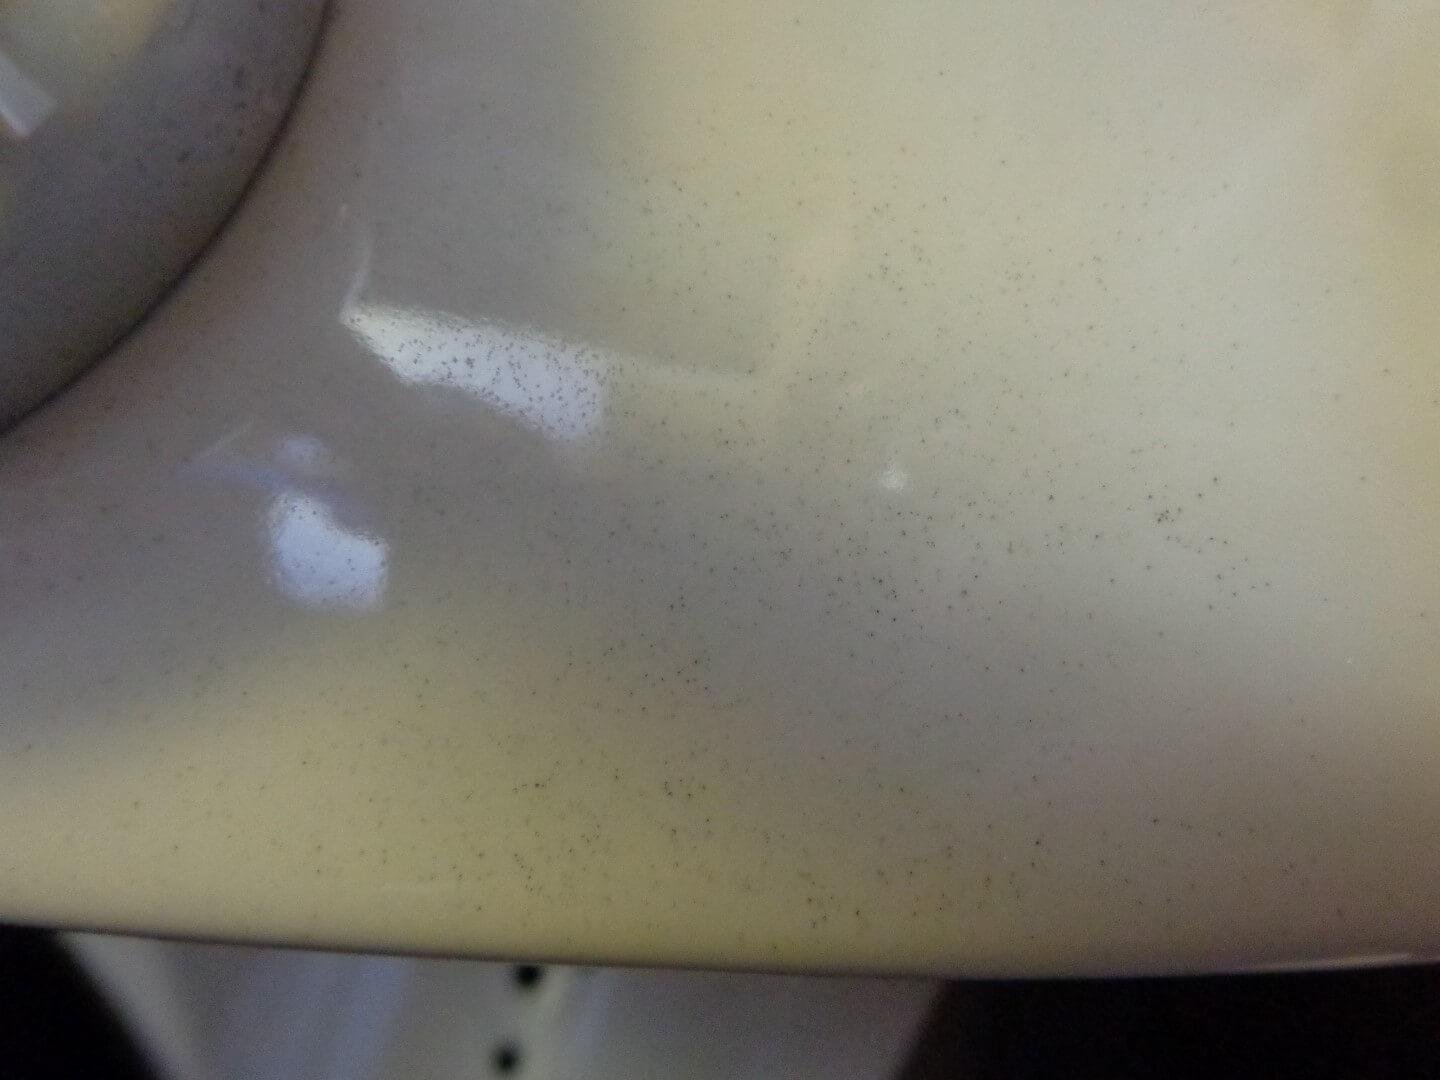
Lesson learned: keep sparks away from porcelain, or any other nice surface you don’t want ruined.
Summary
I’m sure I’ll end up re-doing everything except the water supply lines when I finish off my basement, but this sure is a convenient addition to my basement for now. I’ve shared photos of residential urinal installations on the Structure Tech Facebook page, and one of the more common comments I received is that urinals are either gross or messy, but I couldn’t disagree more. Anyone who thinks they’re gross is probably comparing them to public urinals. Sure, the areas around those can be gross, but when the urinal is in one’s own home, one has laser-focused aim and there is absolutely zero mess. Liquids go where they’re supposed to go, and nowhere else. There’s nothing not to like.
Author: Reuben Saltzman, Structure Tech Home Inspections
![]()
![]()
![]()
![]()
![]()
![]()
bill
February 24, 2015, 7:44 am
“a nice surprise for my wife”?
I can imaging most women being surprised but “nice surprise” is not what I would expect.
Saw a house for sale in Maple Grove where the husband had installed a urinal and sink in the garage. I understood the reason for wanting to take care of things in the workshop before coming into the house.
I heard some comments that indicated that she did not think the urinal was an acceptable item there.
Reuben Saltzman
February 24, 2015, 10:31 am
@Bill – yeah, that comment was meant to be a little tongue-in-cheek. My wife probably ventures down to the basement about once a week, so she could really care less. I think.
James
February 24, 2015, 7:55 am
For the porcelain stains, maybe try leaving a layer of baking soda paste overnight and then scrubbing again? This is what I do for my glass bakeware that gets stains from being used in the oven. The paste is just baking soda and water so it’s inexpensive and worth a shot.
Reuben Saltzman
February 24, 2015, 10:32 am
@James – thanks for the tip. I’ll give it a shot.
Charles Buell
February 24, 2015, 1:02 pm
Hey Reuben, I am pretty sure a light wash of muriatic acid will take away the bits of embedded metal—but be careful as muriatic acid is really hard on the glaze as well.
Reuben Saltzman
February 24, 2015, 8:51 pm
Thank you, Charles. I’ll be sure to give that a shot, and I’ll let you know how it goes.
Dave K
February 24, 2015, 7:26 pm
I understand the urinal for possible piping reasons. I grew up with 3 brothers and we had a urinal on the top floor of our 1 1/2 story Cape Cod home that. We had the whole upstairs as one big bedroom with beds that pushed on rails into the side attic eaves.
I think the piping was 2 in so that was the main reason, but it was rather odd to explain to the neighbor girls and girl cousins and we did catch one cousin thinking he could poop in it.
Urinals are just not that common and I can see why.
Reuben Saltzman
February 24, 2015, 8:51 pm
Now that is funny.
Colin
February 25, 2015, 8:18 am
Hi! A typical well planned job! Murphy’s law comes to mind.
There is one thing I noticed, you drilled holes for the water pipe too close to the bottom of the joists. This weakens them, holes should only be drilled as close to the top as possible. Imagine the physics if you put weight above the hole.
Reuben Saltzman
February 25, 2015, 1:48 pm
Thanks, Colin. Holes are actually allowed almost anywhere in that type of joist. Here’s a link with more info on that topic: http://www.homeownersnetwork.com/booktopic/manufactured-wood-floor-trusses-joists/
Colin
February 26, 2015, 12:13 pm
Very interesting Reuben! We live & learn, I never thought of I beams. My apologies – think twice write once!
Colin
Eric Otterness
March 13, 2015, 9:27 am
Just pee in the sink man!
Elisha
March 20, 2015, 10:14 am
Thanks for the article Rueben; looks like I’ll be the only female voice, but that’s ok. When we bought our house in Minneapolis last year I told my husband that one thing I wanted to do eventually was to add a urinal to the lower level half bath. It is off “his” bar, near the family room and is unusually large for a half bath. Non-commercial urinals can be very cool looking I think and I thought it would be a nice add on for my husband and other guys who visit our home. I IMMEDIATELY became the coolest wife of all time! It’s down on the list of reno priorities, but we’ll do it eventually and when we do we’ll make sure to take your experience into consideration.
Reuben Saltzman
March 20, 2015, 11:25 am
@Elisha – you’re the best.
homeinspectororlandofl
March 20, 2015, 10:22 am
hi Reuben, I am pretty sure a light wash of muriatic acid will take away the bits of embedded metal—but be careful as muriatic acid is really hard on the glaze as well.
My favorite tool: the Milwaukee M12 FUEL™ 1/4" Hex Impact Driver | Structure Tech Home Inspections
April 14, 2015, 4:22 am
[…] a 1/4″ hex shank, or you need to use a hex shank adapter, shown at right. During my recent urinal install, I used my impact driver to bore 1-1/4″ holes through the top plates of my wall, and it went […]